<-- Stage 5 / Stage 3 UBS: Review by the community
| Special text -->
Stage 6 / 4 UBS: Finalising for Publication
The sixth stage of a translation project (or fourth stage for UBS) is finalising for publication. Finalising a scripture portion is much simpler than finalising a New Testament or a whole Bible. This involves tasks such as adding images, extra material, checking parallel passages and a number of other final checks.
The following modules will help you in this stage:
23: Finalising for Publication
Introduction
This module looks at the variety of tasks needed to finalise book(s) for publication. The next module looks at the additional tasks needed for finalising a whole New Testament.
What you will do
- Add illustrations and captions
- Verify all checks are complete
- Proper Names final check
- Formatting checks.
-
23.1: Choose illustrations and write captions
There are over 2800 images available so it can be difficult to choose illustrations. Fortunately, it is possible to search on images by chapter reference and keywords in several languages. Note, any illustrations you insert in Paratext will stay in your project. It is recommended to only add these small jpg files (or alternatively just the filename), then at typesetting they will be changed to the larger hi-res images.
23.1.1: Download a folder of searchable images
First time only:
23.1.2: Test various searches
When your Pictures are indexed, you can test various searches.
-
23.2: Add illustrations and captions
- Go to the verse where you want the illustration.
- Insert > Figure
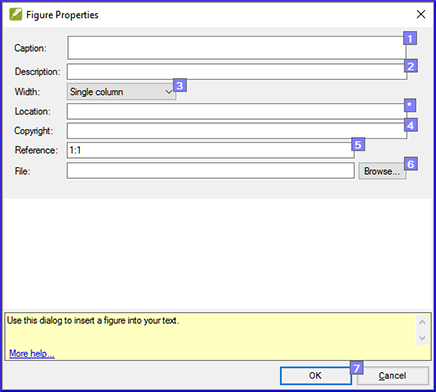
- Type in the caption for the image (in your language). [1]
- Type in a description of the image (in the language of the typesetter) [2]
- Choose the width (either single column or page) [3]
- If applicable, type in a verse range as an acceptable location [*] (optional)
- Type in the copyright information [4]
- Paratext will fill-in the reference (of the current verse). [5]
Browse to search for the image file
- Click Browse... then find figure/illustration file. [6]
- Click OK.
-
23.3: Verify all checks are complete
23.3.1: Current book
- Open the project plan.
- Confirm that there are no issues on any of the checks.
23.3.2: Several books
- Redo the inventories.
- ≡ Tab, under Checking > Run basic checks
- Make sure all checks are ticked
- Make sure all books to be published are chosen
- Click OK.
- Correct any errors.
23.3.3: Word list checks
From the word list, do the following checks
- ≡ Tab, under Tools > Spell check > All checks
- ≡ Tab, under Tools > Find Similar Words
- ≡ Tab, under Tools > Find Incorrectly Joined or Split Words
-
23.4: Proper Names final check
- ≡ Tab, under Tools > Biblical Terms
- From the File menu, Select Biblical Terms list and choose the Major Biblical Terms list
- Filter on names with missing renderings
- Check that all names have a rendering (add if necessary).
-
23.5: Numbers, money, weights and measures
- Click in your project.
- ≡ Tab, under Tools > Biblical Terms
- ≡ Tab, under Biblical terms > Select Biblical Terms List
- Choose the appropriate list.
- Add renderings as usual.
-
23.6: Formatting checks
- Redo the module FC: Formatting checks.
- ≡ Tab, under Tools > Checklists > Long/short verses
- ≡ Tab, under Tools > Checklists > Word or phrase
24: Finalising for Publication – extra tasks for New Testament
Introduction
This module deals with the various additional tasks that must be done to finalize the the text of a New Testament for publication. You need to complete all the tasks in the previous module as well as the additional tasks in this module.
What you will do
- Identify names for the maps
- Draft Introduction to the NT/Bible
- Verify all checks are complete
- Numbers, money, weights and measures check
- Formatting checks.
- Check and link glossary entries
- Check parallel passages
-
24.1: Map names
Teacher's Note: The Combined NT Maps Biblical Terms list is not a standard list in Paratext 9. It is available here: https://raw.githubusercontent.com/erros84/PTManuals/master/Resources/CombinedNTMapBiblicalTerms.xml and, once downloaded, the file should be copied into C:\My Paratext 9 Projects.
- Click in your project.
- ≡ Tab, under Tools > Biblical Terms
- ≡ Tab, under Biblical Terms > Select Biblical Terms List
- Choose CombinedNTMapBiblicalTerms
- Add renderings for all terms
- ≡ Tab, under Biblical terms > Export as HTML
- Type a name for the file
- Click Save.
-
24.2: Draft Introduction to the NT/Bible
- Change to the book INT
- Make sure there is an \h line after \id
- Type your introduction commencing with the following markers:
\mt1
\is
\ip - Continue to type in the overall introduction to the Bible/NT in the book INT
-
24.3: Verify all checks are complete
24.3.1: Current book
- Open the project plan.
- Confirm that there are no issues on any of the checks.
24.3.2: Several books
- Redo the inventories.
- ≡ Tab under Tools > Run basic checks.
- Make sure all checks are ticked.
- Make sure all books to be published are chosen.
- Click OK.
- Correct any errors.
24.3.3: Word list checks
From the word list, do the following checks:
- ≡ Tab, under Tools > Spell check > All checks
- ≡ Tab, under Tools > Find Similar Words
- ≡ Tab, under Tools > Find Incorrectly Joined or Split Words
-
24.4: Proper Names final check
- ≡ Tab, under Tools > Biblical Terms
- ≡ Tab, under Biblical terms > Select Biblical Terms list and choose the Major Biblical Terms list
- Filter on names with missing renderings
- Check that all names have a rendering (add if necessary).
-
24.5: Numbers, money, weights and measures
- Click in your project.
- ≡ Tab, under Tools > Biblical Terms
- ≡ Tab, under Biblical terms > Select Biblical Terms list
- Choose the appropriate list.
- Add renderings as usual.
-
24.6: Formatting checks
- Redo the module FC: Formatting checks.
- ≡ Tab, under Tools > Checklists > Long/short verses
- ≡ Tab, under Tools > Checklists > Word or phrase
- ≡ Tab, under Tools > Checklists > Section headings
- ≡ Tab, under Tools > Checklists > Book titles
- ≡ Tab, under Tools > Checklists > References
- ≡ Tab, under Tools > Checklists > Footnotes
-
24.7: Check and link glossary entries
Linking glossary items to the text is done from the Biblical Terms tool, and is usually one of the last tasks before publication to ensure that none are missed due to further corrections. If you have already linked terms it may be necessary to unlink terms before linking again.
- Open the Biblical Terms Tool
- Filter on Glossary entries
- Select one or more terms
- ≡ Tab, under Edit > Link selected entries to the glossary
A dialog box is displayed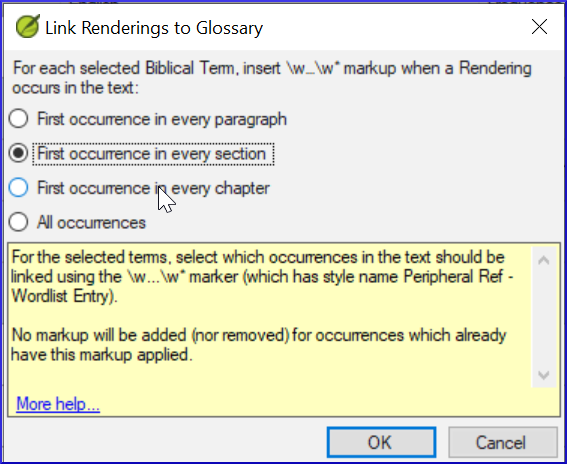
- Choose First occurrence in every section
A results list is displayed of each verse linked and any errors.
Warnings: It is wise to only link a few terms at a time. Be careful if there are homographs as Paratext may mistake one for the other. Also be careful when a rendering for one term is part of a phrase in another term. Also you may need to add Biblical terms for some glossary entries.
-
24.8: Enter Publication Information
- Open Project Properties for your project.
- Click on Manage the Project Registration.
This will take you to the entry for this project on the web. - Go to the Publishing tab on the registration site and complete the information above the horizontal line.
-
24.9: Check parallel passages
- See module PP: Parallel passages
25: PP – Compare Parallel Passages
Introduction
There are thousands of passages in the NT where either the same event is being described or where another verse is being quoted from the Old or New Testament. These verses need to be compared to make sure they are consistent.
Where we are
Normally you will have translated and checked the text of both books with a consultant first before comparing the texts. Though there are times that you will want to compare the other verses before you translate the second passage.
Why this is important
The parallel passages need to be consistent but they do not always need to be exactly the same. The Parallel Passages tool displays the various passages and highlights the text which is the same. But it is the meaning (not necessarily the form) that is important.
Normally you would make the comparisons after you have translated the passage because you don’t want to be influenced by what could be a bad earlier translation. But there are times when you will want to be able to see a second passage while you are translating.
What you are going to do
- use the Parallel Passages tool to compare the verses.
- use the check boxes to tell Paratext that you have checked the passages
- filter for any changed verses
- open a quick reference window in Paratext to see another passage while you are translating.
- open a third passage in a window at the same time.
-
25.1: Open the Parallel passages window
- Navigate to the desired chapter and verse.
- ≡ Tab, under Tools > Parallel passages
A window is displayed showing a list and parallel passages.
-
25.2: Display source texts
- Click the dropdown arrow beside the source text options
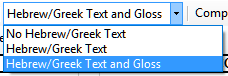
- Choose as appropriate
The display changes.
-
25.3: Select comparative texts
- Click the Comparative texts button
- Click a resource (on the left)
- Click the right arrow
- Repeat as necessary
- Click OK
-
25.4: Filters
- Choose the filters as desired: [e.g. All references, Current book, Synoptic gospels]
-
25.5: Compare the passages
- Click on a line of references in the top pane.
The texts are displayed in the bottom pane.
Text is shown in green when the text is exactly the same as in the other passage.
Text is shown in yellow when it has the same meaning (thought) even though it is not exactly the same as in the other passage (e.g. a different form of a verb or a synonym).
If the text is green in Greek, then your text should also be the same.
Normally, if the text is different in the Greek than it should be different in your text, but not always.
-
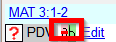
25.6: To correct the text
- Click the blue link « Edit »
- Make the corrections.
- Click OK.
-
25.7: Copying a text
If two passage need to be the same, you should choose one (normally your later translation) and copy it over the other.
- Click the blue link « Edit »
- Select the text
- Copy (Ctrl+C)
- Click OK.
- Click blue link for the other text
- Select the text
- Paste (Ctrl+V)
- Click OK.
Be careful when there is more than one verse. You don’t want to paste the \v.
-
25.8: Mark the passage as checked
- Click the check box beside the reference.
In Paratext 9 the check box marks the passages together. If you want to approve the passages individually (as in Paratext 8), you can use the ≡ Tab, under View menu > Approve passages individually.
-
25.9: Passages which have changed
Identify the passages which have been changed since they were marked as finished
- In the Parallel passage tool
- Change the passage filter to « Changed Text »
- Click ab icon under the passage reference.
A comparison window is displayed in Paratext. - Change the text as necessary.
- Return to the Parallel passages tool (using the task bar icons)
- Click the check box to mark it as finished.
-
25.10: Compare the text as you translate
- Click in your project.
- ≡ Tab, under Tools > Quick reference (Ctrl+q)
A window opens with the scroll group set to none. - Change the reference to the other passage.
-
25.11: To see a third passage
- Open you project a second time [≡ Paratext > Paratext > Open et double-click your project]
- Change the scroll group from [A] to None.

- Change the reference to the other passage.
If the scroll group icon is not shown on the toolbar, then you need to choose full menus. [≡ Paratext, under Help > Full menus
<-- Stage 5 / Stage 3 UBS: Review by the community
| Special text -->
