<-- Course Introduction |Stage 2 : Team Checking -->
Stage 1: Drafting
Introduction
There are several stages in a translation project. In this first stage you will use many of the resources to ensure that you understand the source text, then you will draft and keyboard the text of the translation along with other materials and also begin the preliminary checks.
The following modules will help you in this stage :
- 2: OD: Organising your desktop
- 3: PP1 : Project Plan and progress
- 4: KD: Keyboarding your draft
- 5: GL: Glossary
- 6: BC1: Basic checks
- 7: PP2: Project progress
2: OD: Organising your desktop
Introduction
As you work with your text in Paratext 8 you will want to see a variety of resources. In this module, you will learn how to open resources and organise your desktop.Where we are
We are about to type text into an existing project. Before you can do this, someone must have already installed the program, created a project for your data and installed resources for you.Why this is important
The translator who organises his/her desktop well has all the resources necessary for his/her work.What are you going to do?
You will start the Paratext 8 program and open a previously saved text combination. If needed you will open other resources, change the arrangement of the windows and resave the text combination.
-
2.1: Load the program

- Double-click on Paratext 8 icon on the desktop OR
- (From the Start menu, choose Paratext 8 )
-
2.2: Open a saved text combination
- Click on the Window menu
- Choose a saved text combination.
Your screen should look like the picture below (if not, see below).
-
2.3: Create a new text combination
If you haven’t already saved a text combination, then we recommend you do the following:
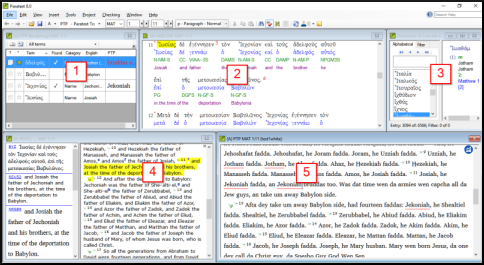
2.3.1: Open and arrange the windows
- Window > Unstacked
- Open the 5 windows as follows:
- 5 =your project (File > Open project/resource
- 1 = Renderings (File > Open Biblical Terms renderings)
- 2 = Source text (File > Open Source language text)
- 3 = Dictionary (File > Open source language dictionary)
- 4= Text collection (File > Open project/resource in Text Collection)
- Arrange the windows as desired.
2.3.2: Save the text combination
Once the windows are arranged as desired:
- Window > Saved text combination
- Type a name [or to replace an existing combination, choose the existing name]
- Click OK
-
2.4: Delete a text combination
If you want to delete a saved combination,
- Window > Delete text combination
- Choose the name of the saved combination.
- Click Delete
-
2.5: Open resources in a Text collection
- File > Open Project/Resource in Text collection
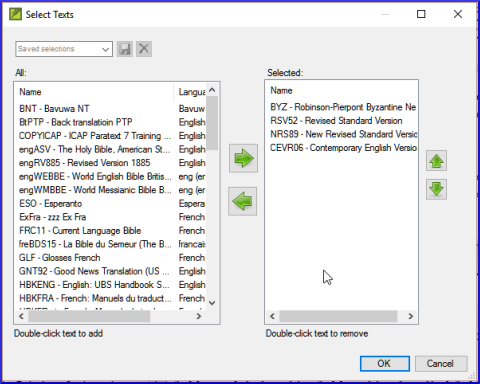
- Click on a resource (at the left).
- Click the right arrow.
- Repeat as necessary.
- If necessary, change the order using the up/down arrow buttons.
- Click OK
-
2.6: Open a dictionary
- File > Open Source Language Dictionary
- Choose « A Concise Greek-English Dictionary of the New Testament »
- View > choose a language (e.g. Français)
-
2.7: Make a list of verses of a specific term from the source language text
- Right click on a lemma (blue word) in the source language text window
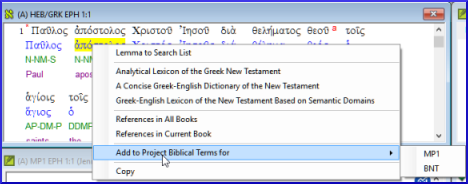
- Choose Add to project biblical terms for
- Choose your project
- Edit the gloss if necessary
- Click OK
- Change to the Biblical Terms Tool
- Double-click on the term.
-
2.8: Recall
- The translators who their desktops have all the _ they need for their work.
- You use the menu to save or delete ___ of text.
- To open windows you use the __ menu.
- Open Biblical terms equivalents Something weird here with spacing on the PDF just ENG
- Open Source language text
- Open Source language dictionary
- Open Project/resource in collection of texts
- Open Project/resource
- You can make a list of verses which have a word from the source language text by clicking _ (right/left) clicking on a in the source language, then choosing _ project .
3: PP1 : Project Plan and progress
Introduction
You use the Project Plan to help organise your work and to see which tasks to do next. Once you have finished the task, you should mark it as completed so that you can report on what has been achieved. [If you have used an earlier version of you will see that it has dramatically improved in Paratext 8 .]Where are we?
Before you can use the plan, it must have been configured. [This is usually done by your project administrator who will add the appropriate organisational plan and configure it for your team.]Why is this important?
There are so many tasks to be done in a translation project. It is important to have a system to make sure these are all done. Now that your plan has been configured, you can use the plan to see what tasks have been assigned to you to be done next. Then when you finish the task, you can mark the task as completed and see the next task to do. You can use this information to generate reports for supervisors and donors (see PP2: Project plan reporting).What are we going to do?
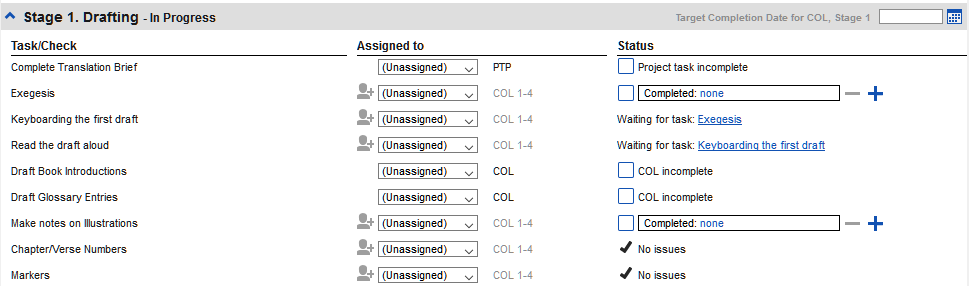
You will mark a variety of tasks as complete. The exact steps will vary slightly depending on whether the task is set to once per project, once per book, or by chapter. The place to mark progress for all types of tasks is the Status column.
-
3.1: Make sure your project is active
- Click in your project.
-
3.2: View tasks that need to be done
- Click "Assignments and Progress" button
 OR
[From the Project menu, select Assignments and progress]
OR
[From the Project menu, select Assignments and progress]
- From the first dropdown menu, choose either My tasks or All tasks
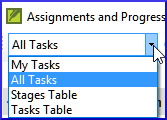
- A list of the various tasks and checks are displayed.
-
3.3: Identify the next task
The list of tasks shows the uncompleted tasks.
- Identify the next task for you need to do.
- Check that it is not waiting for another task.
- Do the task (see other modules if necessary).
-
3.4: Mark a task as complete
3.4.1: Mark a book task as completed
- Click on the checkmark to the left of the status.
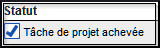 It should turn solid to show it is completed.
3.4.2: Mark a chapter task as completed
- Click + to mark the next chapter as complete
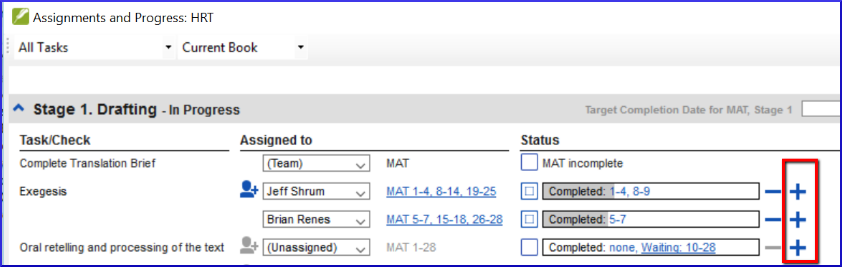
- To mark other chapters as complete you can click on the word Completed.
 A dialog box is displayed with a list of the chapters.
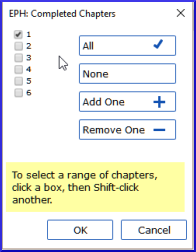
- Check the chapters that have been completed.
-
3.5: Checks
- If the task is a check, the status of the check will either say setup required or it will show number of remaining issues.
- A check is complete when there are No issues.
3.5.1: Checks - setup required (Administrator)
- Click the blue link "Setup required" Paratext 8 will run the appropriate inventory or open the settings for that check.
- Complete the setup as appropriate.
- Close the window when finished.
3.5.2: Checks – issues
- Click on the blue link “ …. issues” A list of errors is displayed.
- Make the necessary corrections.
- Close the list result.
- File > Save all (or Ctrl+s).
- Return to the Project plan.
4: KD: Keyboarding your draft
Introduction
This module explains how to keyboard your draft translations into a project in Paratext 8.Where we are
We are about to keyboard text into an existing project. Before you can do that, someone must have already installed the program and created a project for your data.Why this is important
This is the first stage of entering your translation into the computer. Once the text has been typed, you can run various checks on the content and format of the text.
-
4.1: Go to a Biblical verse
- Using the icons on the toolbar, change the project, book, chapter and verse as needed.

-
4.2: Check that the project is editable
- Look at the titlebar of your project.
 The titlebar should either have your name or the word (Editable).
- If your project is shared and your name is not on the titlebar, you should talk with your project administrator.
- If it is not editable, try changing the view (see below).
-
4.3: Changing the view
- Ctrl + E -or-
- From the View menu, choose the view (usually Standard).
-
4.4: Typing special characters
- Change your keyboard system as needed on your computer.
- If you are using Keyman then choose Tchad Unicode (or for MS-Keyboards choose TR or SQ/TZ/AF…)
- Type the keys as in the table in Appendix .
-
4.5: Adding text in another marker - title or introduction
- Move your cursor to the end of the previous paragraph :
- Type Enter ou type « \ »
- Type the marker (e.g. s1 or ip) « Enter » (or select it from the list).
- Type the text
- Add a paragraph marker after the text (for example : \p)
-
4.6: Add paragraph breaks
- Move the cursor to where you want to break the paragraph.
- Press Enter
- Type p, then Enter.
-
4.7: Saving your work
- File > Save All –or- Ctrl + S
-
4.8: Insert Footnotes
- Insert > Footnote
- A set of footnote markers is added in the box below the text

- Type the text after the \ft
If you hover your mouse over the superscript letter the text of the footnote will be displayed in a tip box.
To change the footnote, click the superscript letter in the text. To delete the footnote you can delete the superscript letter.-
4.9: Send/receive to the Internet to backup your data
- Make sure your computer is connected to the Internet.
- File > Send/Receive project(s)
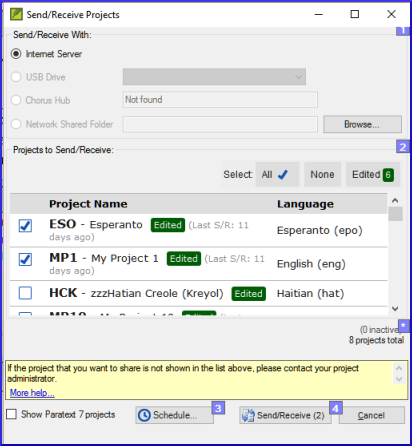
- Choose Internet Server
- Check the box next to the projects to Send/Receive.
- Click Send/Receive. The computer will make a copy of your files. A progress meter will be displayed. A message box will only appear if there are any problems.
-
4.10: Send/receive to a USB stick to backup your data
- Insert your USB key into your computer.
- File > Send/Receive project(s)
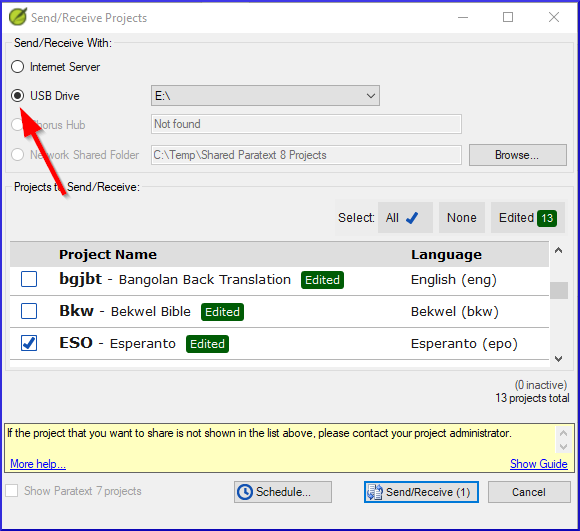
- Choose USB drive.
- Check the box next to the projects to Send/Receive.
- Click Send/Receive.
The computer will make a copy of your files. A progress meter will be displayed. A message box will only appear if there are any problems.
-
4.11: Send/Receive Again
- Insert your USB key into your computer or connect to the Internet.
- Click the Send/Receive icon
 .
Paratext will immediately send/Receive.
.
Paratext will immediately send/Receive.
-
4.12: Moving your cursor efficiently
- The arrow keys, ← ↑ → ↓ Home, End, PgUp, et PgDn, F8 (chapter), F9 (book)
- or Ctrl + any of those keys
-
4.13: Recall:
If the titlebar doesn’t say Editable (or your name), you should try changing the __.
To add a different marker (such as section heading) you press ___.
To add paragraph marker you type .
To insert a footnote, you use the _ menu and choose .
To send/receive, you use the menu then .
[Answers : view, enter or \, enter, Insert, Footnote, File, Send/receive]
5: GL: Glossary
Introduction
This module explains how to add entries to the glossary using the Biblical terms tool.Where we are
You have drafted and entered your text in Paratext 8. Now you will draft and enter some glossary entries to explain some of the terms.Why this is important
It is good to have a list of important words and their explanations so that the readers can understand the text well. Rather than typing directly into the glossary, it is better to use the Biblical terms tool as it keeps the Glossary in alphabetical order. The tool also keeps track of the changes to the glossary.What you are going to do
You will use the Biblical terms tool to add a rendering for the term and then use the glossary tab to enter the citation form and the definition.
-
5.1: Add an entry
- Move to a verse which contains the term you want to add to the glossary.
- Right-click and choose "View Biblical Terms", then "Current Verset(s)"
- Check that you have the correct list open (p.ex. NT Key Biblical Terms [SIL])
- Double-click on the term in the list in the top pane
- Click the "Glossary" tab
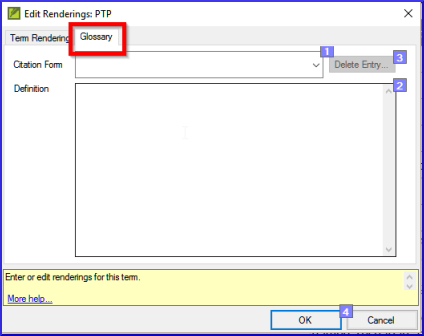
- Type the citation form of the term (i.e. the way you want it in the glossary) [1]
- Type the Definition [2]
- Click OK The word(s) and the definition will be added to the glossary in alphabetical order.
-
5.2: Link an existing entry
- Check that you have selected the correct list (ex. NT Key Biblical terms [SIL])
- Double-click on the word in the list in the top pane
- Click the "Glossary" tab
- Click the down arrow near the citation form [1]
- Choose the entry from the glossary
- Click OK
-
5.3: View the glossary
In Paratext
- Use the navigation bar to change the book

- Choose the GLO book
-
5.4: Edit an entry – in the GLO book
In Paratext
- Open the GLO book
- Edit the text as normal.
-
5.5: Edit an entry – in the Biblical Terms
- Tools > Biblical terms...
- Double-click on the word in the list in the top pane.
- Click the "Glossary" tab
- Edit the definition
- Click OK.
-
5.6: Add a Biblical Term
- see the section 10.6: Add a term 10.6: Add a term
-
5.7: Recall
- You open the Biblical Terms tool from the menu.
- The « glossary » tab is on the dialogue. To open this dialogue you -click on the term in the _ pane.
- To view the glossary, you change to the _ book (after Revelation).
6: BC1: Basic checks
Introduction
In this module, you will check the chapters/verses and the markers using two methods: the Project plan and the Checking menu.Where we are
You have typed your text in Paratext 8. Now you want to start checking. In this module we start with the first two basic checks. The remaining checks are covered in 12: BC2: Basic checks in this manual and chapter 5 in the following manual.Why this is important
These checks allow you to be sure that you have all the chapters and verses and that the other markers are correct. It is important to run the chapter/verse check first because all the other checks depend on it. Doing these checks allows you to complete the Drafting stage.What you are going to do
You are going to run the first two basic checks using two different methods.The easiest way is to run the checks from the project plan. However, you can also do the checks from the checking menu if you need to check more than one book at a time.
-
6.1: Running checks from the project plan
It is easier to run the checks from the project plan.
- View the project plan by clicking on the icon
(at the top right of your project window).

- If there are any "issues" (errors), click the blue link to the right
 A windows appears with a list of the errors.
- Double-click a line in the list.
- Correct the error in your project.
- Double-click the next line in the list.
- Continue for all the errors.
- Click "Rerun" button to check that all the errors have been corrected.
- Close the results list window.
- Continue with the markers check.
-
6.2: Running the checks from the menus
6.2.1: « Chapter/ Verse »
- Click in your project window
- Checking > Run basic checks
- Check only Chapter/verse numbers
- Uncheck any other checks
- If necessary, click Choose… and choose the book you want to check
- Click OK A windows appears with a list of the errors.
- Double-click a line in the list.
- Correct the error in your project.
- Double-click the next line in the list.
- Continue for all the errors.
- Click "Rerun" button to check that all the errors have been corrected.
- Close the results list window.
6.2.2: Markers check
- Checking > Markers Inventory The list shows an overview of the markers in your text. You cannot change anything but you can look for markers which may be errors.
- Close the marker inventory.
- Checking > Run Basic Checks
- Check the Markers
- Click OK
- Correct any errors.
7: PP2: Project progress
Introduction
In this module, you will learn how to update your progress and create a progress report.Where we are
You have been working on your translation and have finished a task. You now want to update your progress.Why this is important
For the project plan to work well, you need to mark the tasks you have finished. This allows Paratext 8 to make the next task available for the other team members. Creating a progress reports helps you prepare a report for your supervisors and funders.What you are going to do
You will open the assignments and progress window and update the progress made. You will then produce a report.
-
7.1: Make sure the progress of the plan is up to date
- Open the project plan (using the button)
- Update the progress on any task (see PP1 for instructions on each type of task).
-
7.2: Change an assignment
 This can only be done by a project administrator.
- From the Project menu, select Assignments and Progress....
- From the first drop-down list at the top left of the dialog, select All Tasks.
- In the "Assigned to" column, use the drop-down list to choose who will have responsibility for the task or check (listed in the "Task/Check" column at the far left).
-
7.3: Produce a progress report
- From the Tools menu, select Project Health Report....
- Choose the project(s) to report
- Click OK. The report will contain a column for each project you selected.
-
7.4: View team progress charts
- From the Project menu, select Progress charts....
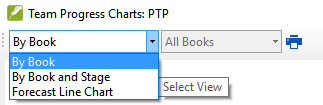
- Use the first dropdown box to choose the type of chart
- Choose the books as necessary.
- Click the print icon A window opens
- Click the Print icon
- Choose your printer (or PDF printer)
- Click OK.