PT9Vid - Drafting
Stage 1: Drafting
-
Vidéo 1.1 How to View Tasks Assigned to you
The administrator of your project can assign tasks to you in Paratext. The task assignments control what you can edit.
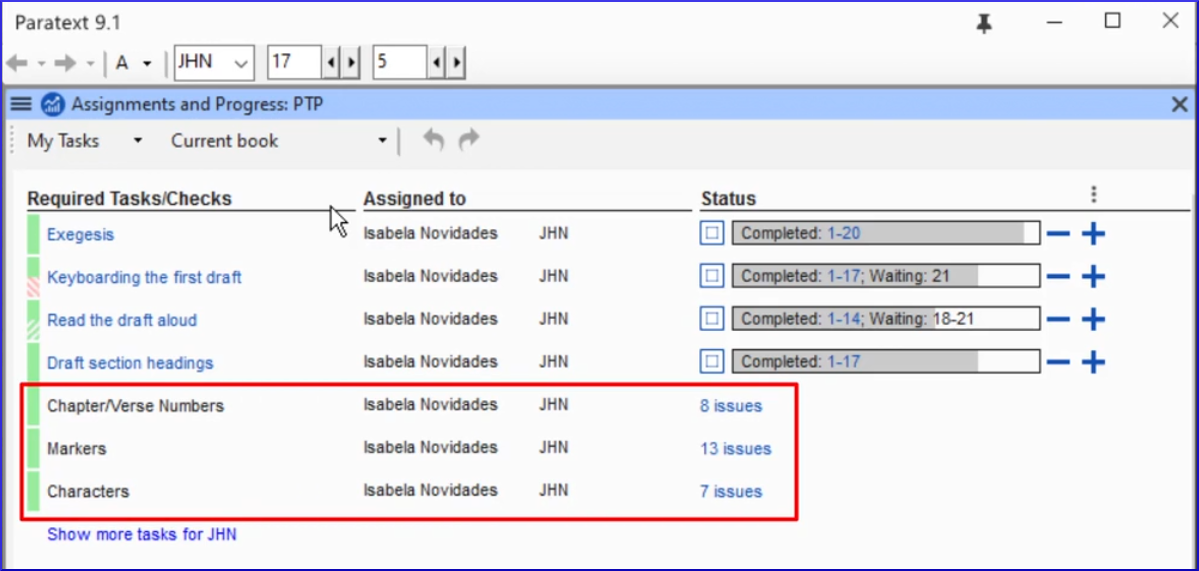
View tasks assigned to you
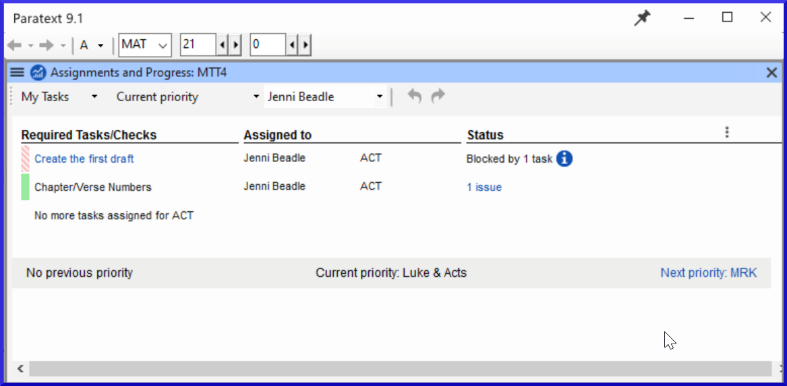
- Open Assignments and progress by clicking on the blue button

The Assignments and Progress window opens, showing My Tasks in the Current Priority or the last view.
Next/Previous Links
- Prev priority- previous book with tasks
- Next priority - next book with tasks
- Change to All Tasks- to see tasks waiting
View tasks by book
- Where it says Current Priority, click to view the menu.
- Click Current Book.
This is the default filter if your administrator has not set up Priorities. - View tasks in another book by clicking Next book or Previous book.
State of tasksGreen:Tasks that can be started right away are marked with green.Striped Green:Waiting on you to finish another task.Red:Tasks are dependent on earlier tasks being finished by others.Grey:Task is complete
- Hover the mouse over the information icon to find out what is blocking it.
- Click Show more tasks to see hidden tasks.
-
Video 1.2.1 Understanding USFMs - Introduction
In this video you learn all about how Paratext uses special tags called USFMs. The tags
- provide the structure of the document by identifying the start of each book, as well as the sections within them.
- help you navigate around the translation using Bible references.
- facilitate the appropriate formatting of the translation by the typesetter according to what each bit of text really is, such as a heading, chapter number, or something special in the Bible text itself such as poetry or a quotation.
USFM stands for Unified Standard Format Marker.
USFMs always start with a backslash, then a code, then a space. (e.g. \ft )
With the exception of a closing marker which ends with an asterisk and doesn't need a space.
- The most common USFMs are:
\p (paragraph) \c (chapter) \v (verse) - The latest USFM standard is online - paratext.org/about/usfm, then click on documentation.
-
Adding markers in different views
Video 1.2.2a Adding Markers in Standard View
This video looked at how to insert Unified Standard Format markers or USFMs in standard view.

- Standard view shows the USFM markers, but they are small and grey. This view is recommended for ordinary work when drafting and editing a translation.
- In this view there are some helps for entering the right marker.
To add a new paragraph
- Press ENTER to add a new paragraph
Paratext automatically opens a menu showing us the possible markers for starting a paragraph, the most frequent are at the top. - Either use the mouse or type the appropriate letter
- E.g. type `P` and press ENTER
To add other (character) markers
- Select the words you wish to mark
- Press \
- Select the marker from the list
Video 1.2.2b How to work with USFMs in Formatted View
In this video we changed to Formatted view and learnt about adding and removing USFM styles here. 
The view options are available on the menu for the project.
- Click show menu ≡ on the project's title bar.
- Expand the menu if necessary .
The option with the checkmark or tick is the currently selected view. - Click Formatted.
The view changes and the USFM tags are hidden.
Entering character markers
- Press` \` backslash
The character marker menu just as in Standard view.
Entering paragraph breaks
- Press ENTER
A new normal paragraph is inserted.
Using style chooser on the toolbar
In both Standard and Formatted views the marker which applies to the text is shown in the Style chooser on the toolbar.
- Select the text
- Click the style chooser.
The most commonly occurring markers are shown at the top. - Select a marker
- If we select a paragraph style, it will be applied to the entire paragraph.
- If we select a character style will be applied to the selected text.
Removing an unwanted character style.
- Select the text
- On the Style chooser select Clear formatting.
The text goes back to normal and behind the scenes the USFM tags have been removed.
Video 1.2.2c How to use Basic View
In this video we learnt how to work in Basic view. Basic view shows the USFM markers, but you cannot change the markers or add markers in this view. You can only type and have the cursor in the white areas. To use this view, someone needs to have set up all the markers needed in your translation for you beforehand. 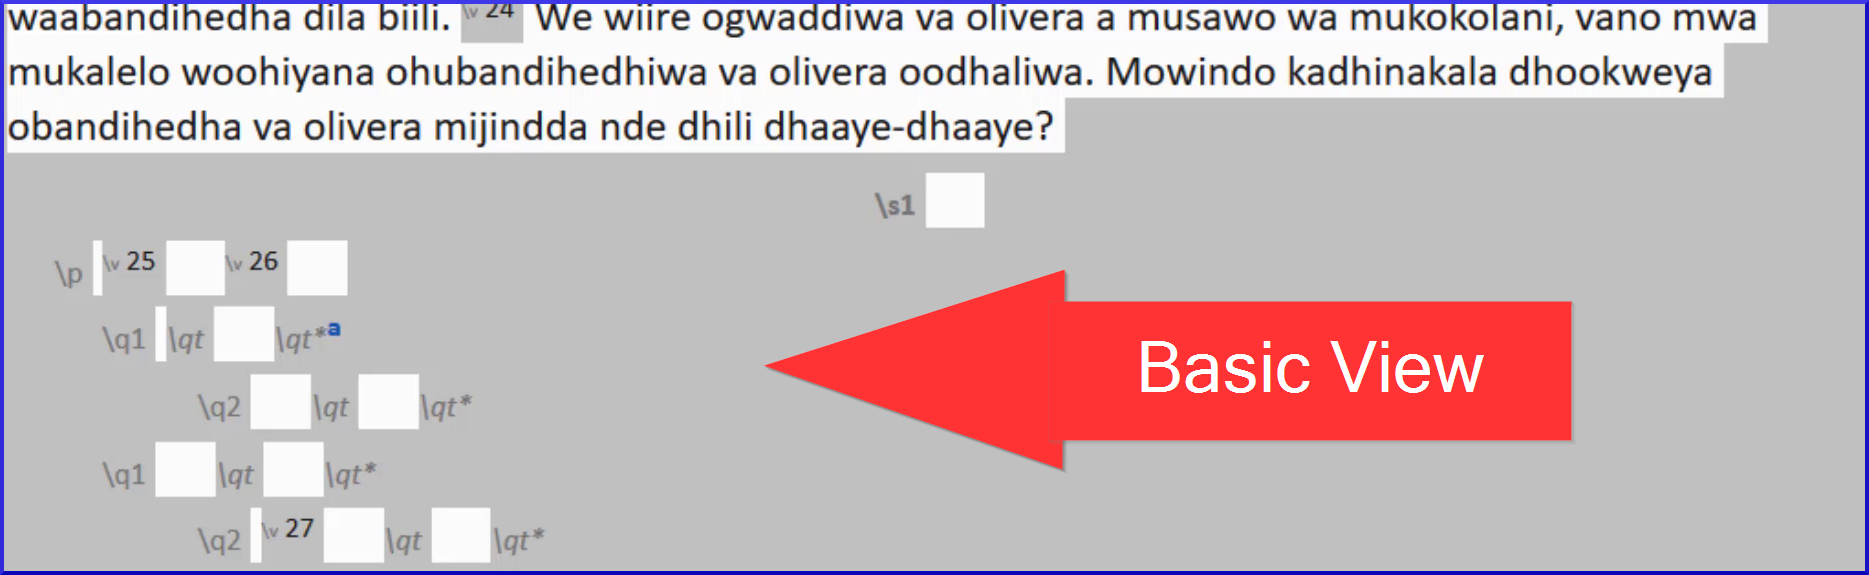
To switch to Basic view,
- Open the menu for the project ≡.
- Expand the menu if needed.
- Under view, click Basic.
To move to the next place to type
- Use the arrow key to move to the next place to type.
- Or click on the text box to move the cursor there.
Video 1.2.2d What is Unformatted View for?
In this video we look at Unformatted View.
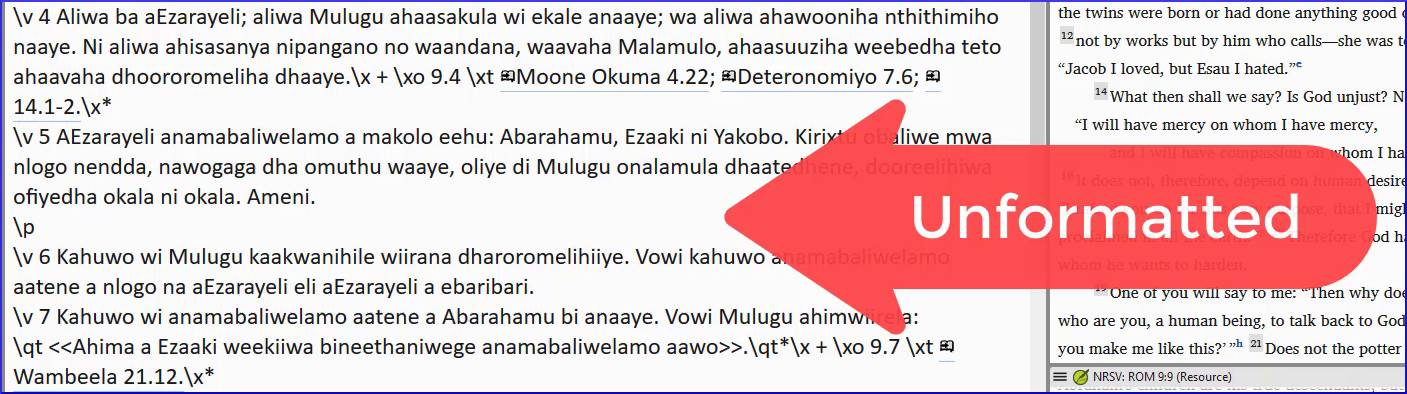
To switch to Unformatted view,
- Open the project menu ≡.
- Expand the menu if needed.
- Under view, click Unformatted.
Unformatted view shows the entire document as plain text.
Note:
- In unformatted view the USFM tags and the Bible text are not visually distinguished by any kind of formatting.
- There are no tools to help you apply or enter USFM tags, but you can edit them directly by simply typing.
- This view facilitates manual editing of the tags if needed.
- This view is not recommended for drafting the translation.
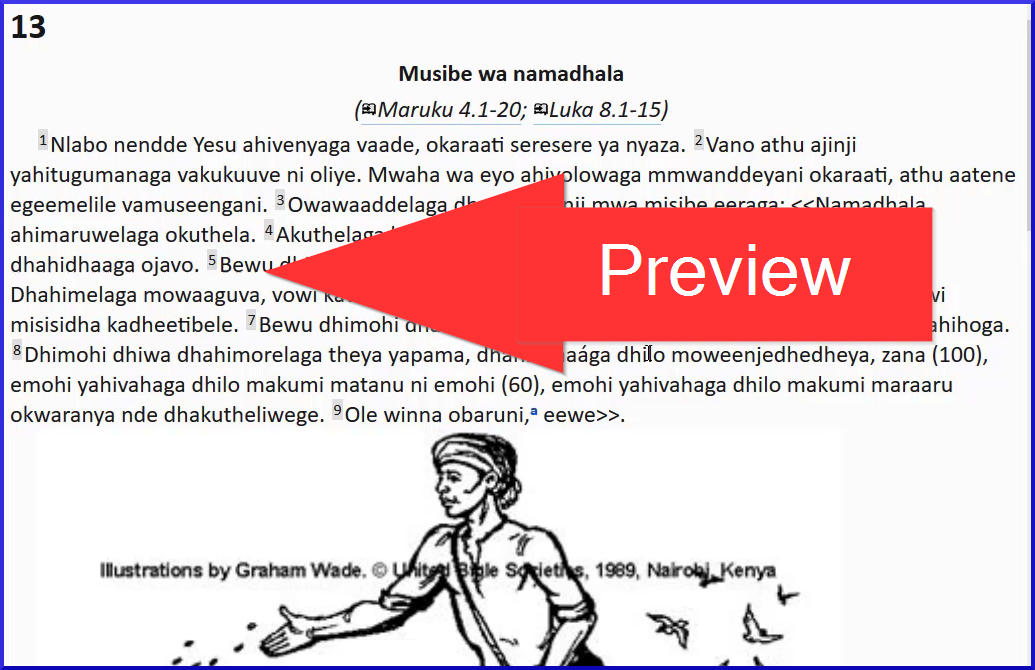
Video 1.2.2e What is Preview?
In this video we learn about the view called Preview.
To switch to Preview
- Open the project menu ≡.
- Expand the menu if needed.
- Under View, click Preview.
This view looks very like Formatted view, with USFM tags hidden, and only their effect on the style of the text shown.
Preview goes even further to make the text look like it will be seen by eventual readers of the translation.
Note:
- There is no grey highlighting of the verse numbers.
- A figure is sized more appropriately.
- In Preview, you cannot edit at all.
- You cannot edit the text in any way.
- Clicking the figure does not bring up the Figure Properties dialog box.
- You can still click a footnote or cross reference caller to open and view the footnote pane.
Preview view looks similar to Formatted view but does not allow any editing of the text or styles at all.
It is useful for viewing the text without any risk of editing.
Summary: Adding Markers in Different Views
There are five views in Paratext:
| Standard view | has visible but distinguished markers,formatted text, and is fully editable. |
| Formatted view | is the same, except the markers are hidden. |
| Unformatted view | has visible markers, no formatting of text or markers, and is fully editable. |
| Basic view | is the same as 'Standard view', except that only the text is editable, not the markers. |
| Preview | is the same as 'Formatted view', except that it is not editable at all. |
-
Video 1.2.3 Backslash Key
In this video you will learn that F5 is an alternative way to type backslash. Backslash is an important key in Paratext because it starts every USFM tag, and opens the menu of markers in Standard view and Formatted view.
Since it is not available on all language keyboards, Paratext provides alternatives.
To insert a backslash character
- Press F5 to insert \
OR - Open the project menu ≡.
- Expand the menu if needed.
- Under Insert, hover over Backslash (\)
A reminder of the keyboard shortcut is displayed in the lower left corner
In standard and formatted view, it brings up the menu of markers
In unformatted view, it simply enters a \
-
Video 1.2.4 The Best Way to Add Verse Numbers
In this video we will learn the best way to insert verse numbers.
Many Paratext users type their translation into a book outline, that includes all the chapter and verse numbers they need up front. However, there are still times when you might need to insert a verse number.
Add a missing verse number (menu)
- Place the cursor where you want the verse number to be inserted.
- Open the project menu ≡.
- Under Insert, choose verse number.
The verse marker is inserted along with the appropriate verse number.
To use the keyboard shortcut
- Place the cursor where you want the verse number to be inserted.
- Press Ctrl+K.
The verse marker is inserted along with the appropriate verse number.
If we try to add a verse number between two consecutive verses nothing happens. If we try to add another verse number at the end of the chapter nothing happens. This feature does not allow you to add more verse numbers than there should be in the given chapter.
-
Video 1.2.5 How to Mark non-Biblical Text
In this video, we will learn about how to mark non-Biblical text. Translators often include extra text in their Bible translations to introduce a book, indicate the start of a different topic in an epistle, indicate the start of a different topic in an epistle, or a different event in narrative, etc.
Section headers
\s1, \s2, \s3 \s4
- Place the cursor where you want to add a section heading here.
- Press ENTER
- Type `s`
The section header markers are now listed. - Type the number to match the heading above, e.g `1` and then press ENTER to confirm.
The marker is displayed in the middle of the window ready for me to enter the heading.
Book introductions
The ordinary paragraph marker should not be used in the introduction to a book.
- Place the cursor where you want to add the introduction.
- Press ENTER
- Type `i`
The introduction markers are now listed. - Choose the appropriate marker.
-
Typing and Editing Text
Video 1.3a How to scroll between chapters in a window
In this video we will learn how to view more than one chapter at a time in a Paratext window. When we open a project or resource in Paratext, by default it only shows us the current chapter.
- Click the project menu ≡.
- Click the expand arrow to view full menus.
- Under View, click Show all chapters.
Paratext loads the entire book into the Window. - (checked = by chapter, unchecked = by book)
We recommend that you leave 'View By Chapter' checked most of the time as it can slow Paratext down when it updates the book.
Video 1.3b How to Change the Size of the Text in a Window
In this video we will learn how to change the size of text in a Paratext window panel.
Using the menu
- Click the project menu ≡ .
Under View, there is a command Zoom with the current zoom level displayed and - and + either side. - To make the text look bigger, click +.
- To make the text look smaller click -.
- Click in the window to close the menu.
Return to original text size
- Open the menu for the project.
- In the zoom control, select the zoom level number
- Type `100`.
- Press ENTER.
- Click on the window to close the menu.
Keyboard shortcut
- Ctrl + increase Ctrl - decreases it.
Zoom level is remembered when you reopen that project.
Only affects your computer, not other members.
Video 1.3c Adding Paragraphs
1.3c Adding Paragraphs
This video was created in Paratext 8 but applies equally to Paratext 9. In this video we learn there are a few places where you must insert a paragraph marker.
You should insert a paragraph marker before verse 1 in every chapter to avoid the markers check reporting an error.
In 'standard view',
- Click where you want to put the paragraph,
- press ENTER, and then select the paragraph marker from the list.
- Click where you want to put the paragraph,
- press 'ENTER',
Add section headings markers
\s1, \s2, \s3 \s4
Be sure to add another paragraph marker after the heading.
Parallel reference headings \r
Remember,
- you always need a paragraph marker before verse 1 of any chapter.
- you always need a paragraph after any 'section head' or 'parallel passage heading'.
Other common markers
- \p standard paragraph
- \m for a paragraph with no first line indent,
- \nb paragraph with no break with the previous paragraph
- \pi where all the paragraph is indented,
- \q1 or \q2 for indented quotes or poetry.
-
Video 1.4.1 How to use Checking Tools (Basic Checks: Chapter/Verse)
Paratext has several tools for checking the consistency and accuracy of a translation. These are called Checks. Some checks require setup. It is important to correct any problems with chapter and verse markers, because, with these errors present, it can be hard for Paratext to show us exactly where things are found (e.g. Wordlist). We recommend you start looking at these issues early, even before you finish a book.
Using the project plan
If checks have been assigned to you, they are listed in the My Tasks view in the Assignments and Progress window.
To view issues found by a check,
- Click the issue count
Paratext lists the items in a window panel.
There will be a Verses Missing issue shown for a span of text that hasn’t been drafted yet. That’s OK. Focus on the issues found in chapters you have drafted.
- Correct errors in the list as needed
- Double click the issue
Paratext moves the project to that reference. - Verse missing - check \v and space before the number
- Duplicated verse - often space between digits
- Unknown marker - check name of marker or space before verse number
- Verse number in heading insert a paragraph marker
Run checks manually
You can also run the checks manually
- Click project ≡ menu, under Tools menu, > Run Basic Checks.
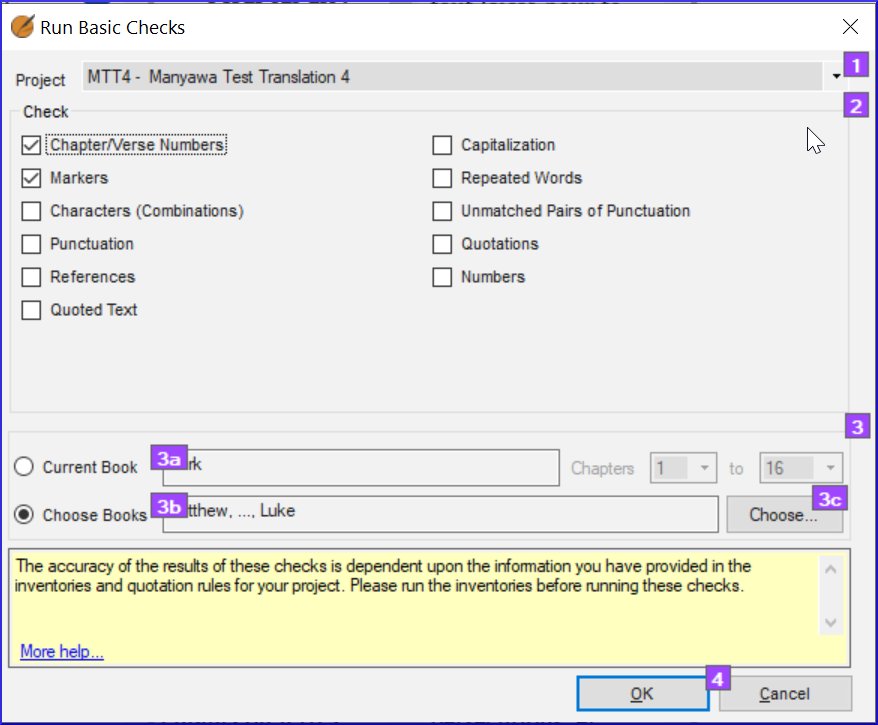
- Choose the desired checks e.g. chapter/verse numbers and markers.
- Click OK
- Correct errors in the list as needed as above.
- Rerun check to be sure error is corrected
-
Video 1.5 How to Mark Texts as Complete
As you work on the tasks assigned to you in Paratext, you need to record what you have finished.This allows the team to see your progress, andmost importantlyallows other team members, who are waiting for your task to be finished, to get started on their tasks.
Open Assignments and progress
- Click on the blue button
.
Mark tasks as complete
- Mark project task or book task as complete: click the check box

- Mark chapter task as complete: click blue +, or unmark click blue -
-
- For more control click none (or chapter numbers), click the chapter numbers
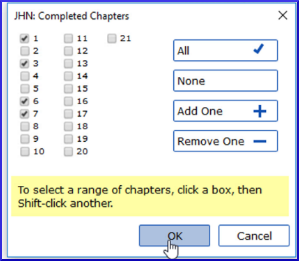
- Click OK
- For more control click none (or chapter numbers), click the chapter numbers
Useful links:
Prev (Book or Priority), Next (Book or Priority), All tasks
Send/Receive
Remember to Send/Receive so that other team members receive the progress status information.
-
Video 1.6 What is a Conflict
A conflict occurs when two or more people edit the text at the same time. Paratext gets confused and does not know which one to keep. It chooses one and adds a conflict note.
It is best to have only one translator edit a text at time. Other team members should add notes of their suggestions (see later videos on notes).
-
Video 1.6.1 Paratext Conflict Notes: What they look like and how to deal with them
In this video we will see what conflict notes look like and how to deal with them. This is the same in Paratext 8 and 9.
- Do a Send/Receive
- Click link Open unresolved conflict notes list window.
Open note and resolve conflict
- Open note
- If the note is assigned to you, or you are an administrator, there will be a dropdown list
- Click the Dropdown the list at the top
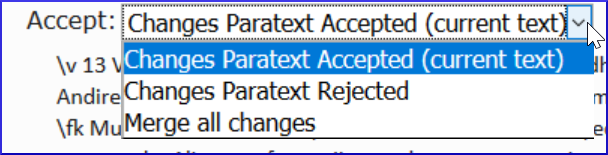
- Choose an option as appropriate
- Accept the changes Paratext accepted (leave it as is)
- Accept the changes Paratext rejected (and reject the other change)
- Merge all changes (accept both changes)
- Click OK
Special warning flag for conflict notes are either at the very beginning of the book or at the verse number.
- Resolve the note to make the flag go away.
Send/Receive
- Do a Send/Receive
Complex conflicts
If there are many conflicts, your administrator may need to revert the book(s).
