PT9 Videos - Introduction
Introduction
When working in Paratext 9, you will want many windows open. Along with your translation project, you will also want resources and tools to help you translate.
Let's take some time to become familiar with the different types of windows and how to arrange them and navigate between them.
But first, what is Paratext?
-
Video 0.1 What is Paratext?
Paratext is the premier Bible translation software used by over 10,000 people worldwide for planning, managing, drafting, reviewing and checking Bible translations in more than 2,300 languages. Here are some of the tools Paratext has to offer.
- A Project Plan, which lays out all the stages needed to be completed in order for a high quality translation to be achieved, with the order in which books should be translated.
- Team members can communicate through a system of notes.
- Paratext supports translation itself in numerous ways, with hundreds of resources and several Enhanced Resources with enable translators less confident in Greek and Hebrew.
- Team collaboration is facilitated by either working off-line or online with Paratext Live.
- Paratext has specialized tools for translation of the Bible, such as the Parallel Passages tool, and the Biblical Terms tool.
- Paratext provides spellchecking features by looking for abnormal patterns to detect potential spelling errors.
- When the text is ready for a translation consultant to check, users can prepare a written back translation for the consultant, and/or prepare a more literal back translation using the interlinearisation tool
- There is a rich provision of training materials available including online videos in multiple languages.
- To download Paratext and apply for a free licence, go to Paratext.org.
-
Video 0.0.3 A quick guide to the Quick Reference window
Open a quick reference window:
- Click on a link in \r line or \xt

The Quick Reference window comes up showing me that other reference.
OR - Click Project ≡, expand the menu, under Tools > Quick Reference
Hint: If you add the window to Autohide, or Dock the window, Paratext will use it to open parallel heading links or cross reference links.
In Paratext 9.1 any floating window now has controls for changing the reference.
-
Windows and Navigation 1
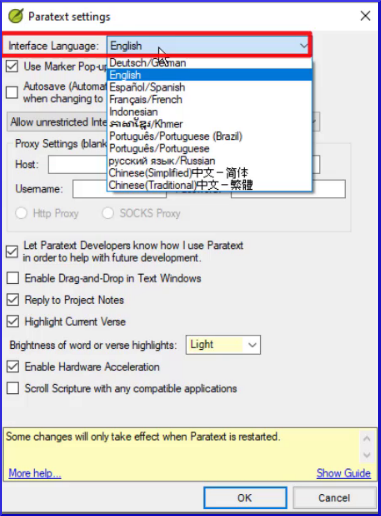
Video 0.2.1a How to change the user interface language
Paratext interface is available in many languages.
- Click Paratext Menu ≡ > under Paratext menu > Paratext Settings
- From the dropdown list of Interface languages > Choose language > OK
Video0.2.1b The basics of projects and resources
Paratext allows you to view several projects or resources at the same time. Each project or resource is shown in a window, with its own title bar and menu. Projects can be editable but resources are never editable.
To open a project or resource
- Click the main Paratext menu ≡, and then click Open.
The Open Project/Resource dialog box appears.
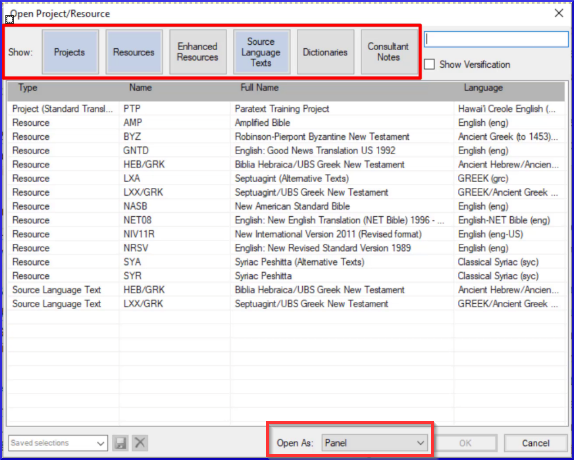
Filter or search for the files you want
- The row of buttons along the top allows you to filter which types of files you see displayed in the list below.
- Alternatively, you can show all filetypes and then use the search box to find the file you need to open.
To open a file
- Click the filename in the list
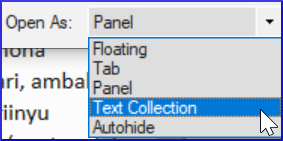
- Choose the type of window (panel, tab, floating window, etc)
- Click OK.
A new window opens.When you start Paratext it will re-open the projects and resources you had open when you last closed Paratext. It also places your cursor in the verse where you last had your cursor.
Video 0.2.1.1 Finding Menu Items
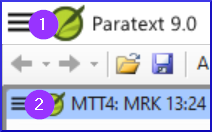
Remember there are two menus - one for all of Paratext (1) and the second for any project window or pane (2).
There are three other things to know about the menus:
- Not just projects and resources, but other windows have their own menus
- There are two sets of menus, standard and full.
- You can search for menu commands
- Click on search box, type the command

- Click on the desired command in results list
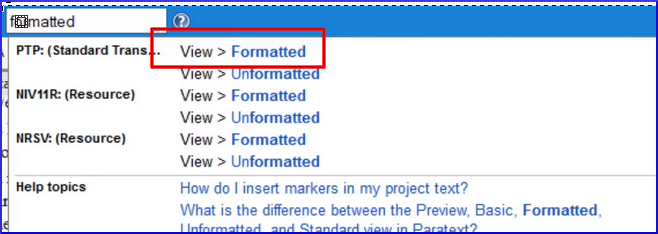 The menu search works even if you are in standard menus and the command you are searching is normally hidden. The same search also shows help topics.
Video 0.2.1c How to Arrange windows
A window within Paratext can be configured to be shown as a panel, a tab, an autohide window or a floating window.
Open a window as a specific type:In the Open Project/resource dialog box, use the Open as dropdown.Re-arrangeClick on the titlebar and drag panels to re-arrange them, release the mouse when the blue box is in the desired position. The blue box shows the place a panel being dragged will move to.Resize:Windows can be resized by dragging the borders.Convert:To convert a window into an autohide or floating window, right click on the title bar and select the appropriate option.Autohide:Click the button (in autohide column) to see it, click outside window to hide it. Right-click a titlebar to send to autohide.Floating window:This is a good way to maximize a window or send it to a second screen
Right-click on titlebar > Open as floating window.
[To return: Right-click > Dock window]
Save current layout
- Click the Paratext menu and select "Save Current Layout...".
- Give the layout a name that will help you remember what it includes.
- Click OK.
The layout name is now shown on the main Paratext menu.
Display different layout
- Click the Paratext menu and click the layout name.
Paratext opens the windows.
-
Windows and Navigation 2
Video 0.2.2a Text Collections
A Text Collection allows us to display several resources in one window. Unlike a tabbed window, a text collection shows us one verse at a time from each resource. The Text Collection window has the same display options as any other paratext window.
Create a text collection
- Close any resources that are already open
- Click the Open button on the toolbar.
- Hold the CTRL key down while clicking to select several files.
- In the Open As dropdown, select Text Collection.
- Click OK.
Paratext opens the selected resources in a new window, and displays the current verse.
Text collection - see more context [01:58]
- Click blue hyperlink of a resource name OR
- Click Tab menu ≡, under View > Two panes
Text collection - close right hand pane
- Click the little X within the right hand pane.
- OR Click the menu button on the title bar, under View, click Two Panes
Modify text collection
You can modify the text collection by change the order of resources, removing a resource or adding a resource.
Change order of resources [02:42]
- Right click on one and select Move up or Move down.
Remove a resource from the text collection.
- If we want to remove this resource, right click and select Close.
Add resources [03:03]
- Open the menu ≡,for this window panel.
- Click Modify Text collection.
The Select Texts dialog box opens.
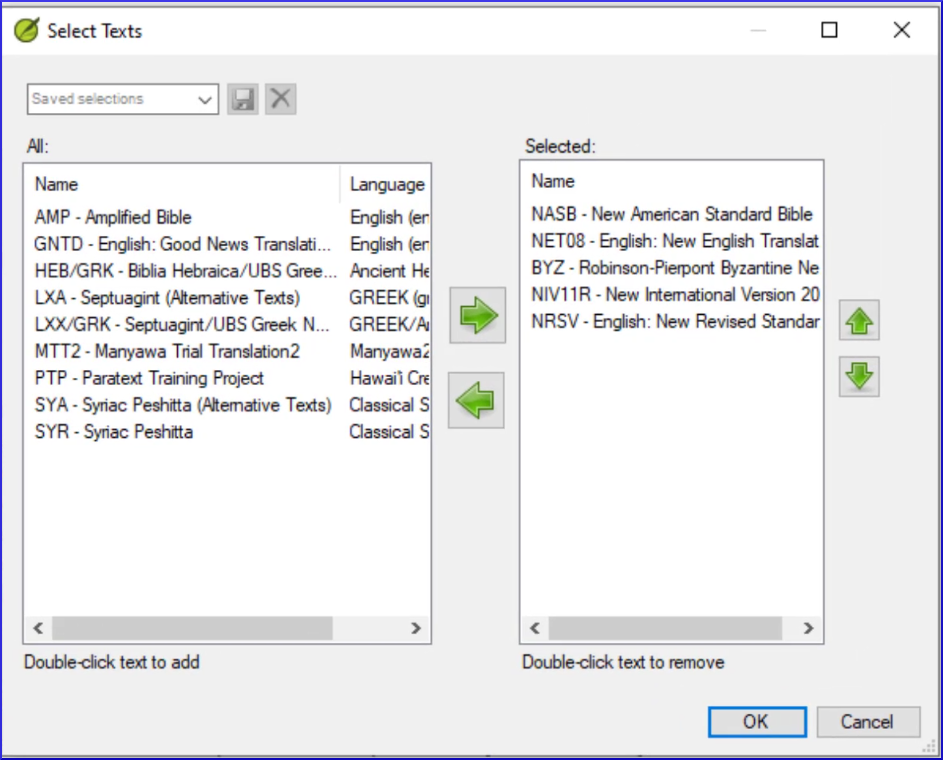
List on the left is all available projects and resources.
List on the right is what is currently shown in the text collection window. - Click left or right arrows to add or remove resources
- Click up or down arrow to reorder resources
- Click OK to make changes occur in the text collection window.
-
Windows and Navigation 3
Video 0.2.3a Scroll Groups
Scroll groups allow you to look up a different reference without having all the windows scroll to the new reference, Paratext allows up to five different scroll groups, A through E. In addition, we can choose `none` (which won't scroll).
The small dropdown control which contains the letter A is how we control the scroll groups.
Change scroll group
- Click to activate the window
- Click the scroll group on the toolbar
- Choose the desired scroll group
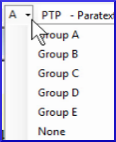
Small letters are shown next to the project abbreviations on the window title bars when the windows are not all in group A.
When you open a new window, it will be in the same scroll group as the last active one.
Video 0.2.3b Keyboards
Paratext can be set to turn on a keyboard automatically when the cursor is in a project that needs it [provided the both Keyman and the keybord is installed].
- Click the Project menu ≡
- Move the mouse over Project Settings.
- In the submenu, select Keyboard.
The Keyboard dialog for this project opens.
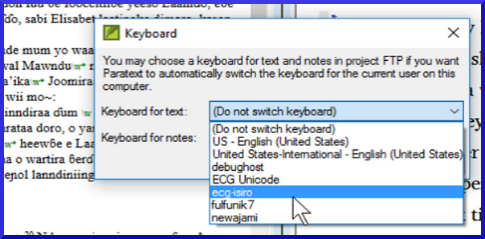
- Choose the Keyman keyboard for typing text.
- Choose the Keyboard for typing notes.
- Click OK.
In some cases it may be useful to set the keyboard to a standard keyboard to ensure you don't type special characters by mistake.
Video 0.2.3c Swap Text in a Window
You can change which text a window displays. This is a way of opening a different text instead of one of your open ones, leaving your window layout the same.
- Click in the window you want to change.
- On the toolbar, click the project list.
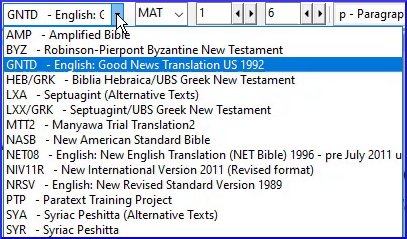
- Select the text you wish to display.
The window now shows the new version instead and the window layout remains the same.
Remember that if you saved this window layout when the other version was here, it was saved in this position and will be re-opened if you use the saved layout again. If the current text selection is what you want to use in future, re-save the layout as it currently is.
Note: At this time, you can only open another similar resource in the window using the project list (i.e Project, Enhanced Resource, Biblical terms).
Video 0.2.3d Further Tips on Arranging Windows
Tip 1: How to swap windows
Swapping two windows may involve two or more steps. [For example, drag one to the left edge and end up with an extra column, then drag the other to the lower right corner (back to original number of columns).
- An alternative way to swap these two texts is by using the project list.
Tip 2: How to undo moving a window
If you make a mistake with a drag,
- Click on the main ≡ Paratext menu.
- Click Undo Tab move.
Tip 3: How to unpin floating windows
- When the thumbtack is slanted, this window no longer stays on top all the time.
-
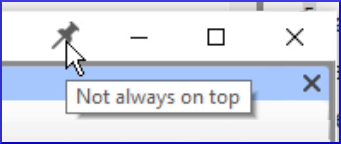
- If you want it to always stay on top again, click the thumbtack icon to pin it.
-

Tip 4: How to widen the autohide column
The autohide column can be made a little wider if desired.
- Click the arrow at the top of the column.
Tip 5: How to undo closing a window
- Click the main ≡ Paratext menu
- Choose Undo Tab Close
Video 0.2.3e How to view other Bible-related texts in Paratext
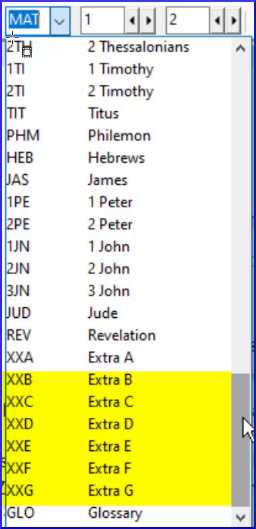
There are many non-biblical books listed after REV (also Deuterocanonical books)
If they were created in the project, you can access these books by clicking on "Select book" in the toolbar.
- e.g. GLO, XXA ... XXG
-
-
Video 0.2.4 Quick Bible Reference Navigation
Go to a specific Bible Reference
- Ctrl+ B,
- Type the 3 letter abbreviation of book name
- Type SPACE type the chapter number
- Type SPACE type the verse number ENTER
Go to the beginning of a book
- Ctrl+ B, type the 3 letter abbreviation of book name press ENTER
Go to the beginning of a chapter
- Ctrl+ B, type the 3 letter abbreviation of book name
- Type SPACE type the chapter number press ENTER
Go to a book by title
- Ctrl+B
- Start typing the title of the book
- Choose from the list.
- Press ENTER
-
Video 0.3 Help in Paratext
Search menus/help
- Click in the search menus/help box on the titlebar.
- Type, and then simply wait while Paratext searches.
The top items in the list are actual commands within Paratext.
If necessary, Paratext uses the abbreviation to show us which window the action will apply to. - If we click any of these commands, Paratext will do the action.
Help
In the second part of the search results Paratext lists all the help topics which match your search.
- Click on the description to open it.
The help topic opens in the help window. - Any text marked in blue is a link to a different topic.
- There are also some topics listed under See Also.
- Each title is a link you can click.
- You can go back by clicking the green back button.
- By scrolling down you can browse other potentially relevant help topics.
- Close the Help file by clicking the X in the top right corner.
Guide
- Open a dialog box (for example, main menu ≡ Paratext > Paratext Settings)
A guide is diplayed to the right of the dialog.
Close guide/show guide
- Click the red X to close the guidet.
- Click the Show guide link to open the guide.
Note: Closing a guide only affects the current dialog box.
Help menu
- Click on the main menu ≡ Paratext
- Click on Help
The help file opens.
You can open the Help file from here, and there are some other useful functions which are only available here.
Online help
- Paratext website. paratext.org/support
- A user forum is also available at LingTran.net
Video 0.3a Download and Install Enhanced Resources
Paratext allows you to view numerous Bible resources to help you in your translation work. Starting in Paratext 9, there are enhanced resources as well as resources. Both types can be downloaded within Paratext from the Digital Bible Library, or DBS.
Download any resource
- ≡ Paratext menu, under Paratext > "Download/Install Resources".
The check box “Show Resources only in languages that match”... is selected automatically. - Uncheck it if needed to view more resources.
- Filter the list by typing in the filter box (type name or language or + for enhanced)
- Click on a resource or enhanced resource to select it for download.
- Click Download/Install
It has finished downloading and installing. Paratext opens one of the resources for me automatically.
Download an enhanced resource (first time)
- Download the enhanced resource as above.
- Download one of the image files in order to see maps and other images.
(The largest one your Internet connection will allow.) - Click Download/Install button
This can take a long time.
Open an enhanced resource
- ≡ Paratext menu, under Paratext > Open.
- Click Enhanced Resources
- Click on the resource
- Click Open
The resource opens. - When you next go to download and install resources, all the resources you have installed already are shown without the checkboxx
-
Send and Receive
Video 0.4 Explain Send-Receive
Teamwork is essential for good Bible translation. To facilitate this teamwork, Paratext allows you to collaborate using a feature called Send/Receive. Send/Receive also creates a back-up of your project on another device and is incredibly valuable even for translators working on their own.
Send/receive – various methods
- Send/receive by Internet (ideal)
- Send/receive by USB
- Network folder or Chorus Hub
Avoiding two people editing at the same
With several people actively working on the same project at the same time, some organization is necessary to avoid situations like two translators drafting the same chapter at the same time! To help with this, each Paratext project has one or more administrators.
An administrator needs to add you to a project, and assign books to you.
Video 0.4.1 Send and Receive for the First time
When the administrator has added you to the project, use the
Send/Receive command to get a copy of the project on your computer.
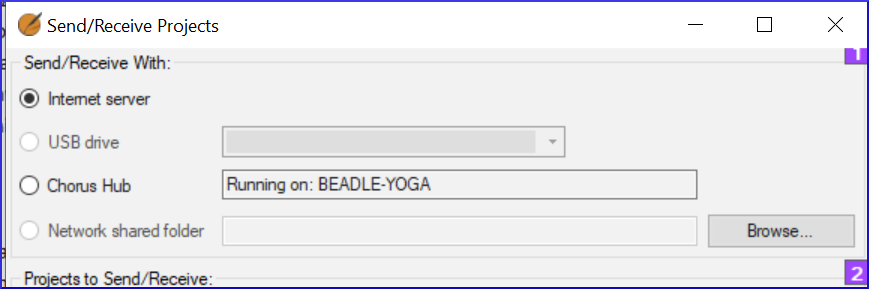
Send/receive by Internet
- Open the main Paratext menu ≡.
- Click Send/receive projects
- Choose the appropriate method (Internet or USB see below)
- Choose the project (New means new to my computer)
- Click Send/receive button
Project will open.
Send/receive by USB
- Insert USB into computer
- Open the main Paratext menu ≡.
- Click Send/receive projects
- Choose USB drive
If it is greyed out, cancel and insert USB - Choose project (New means new to my computer)
- Click Send/receive button
Project will open.
Send/receive by Network folder
- Open the main Paratext menu ≡> Send/receive projects
- Choose Network Shared folder
- Click Browse and choose the network folder
- Choose project (New means new to my computer)
- Click Send/receive button
Project will open.
Video 0.4.2a Send/Receive Regularly to Keep a Shared Project in Sync
In this video, you learnt about using send/receive regularly to keep sharing your work with your colleagues, and to receive their changes.
Send/receive - icon on taskbar
- Use the shortcut icon on taskbar to do the same type of send/receive.
Send/receive - project menu ≡
- Click the project menu ≡
- Choose Send/Receive this project
Schedule Send/Receive
- Click the main Paratext menu ≡
- Choose Send/Receive projects

- Click Schedule
- Select the project.
- Choose schedule setting (hourly, every four hours, daily, or on startup and shutdown)
- Click OK to set the schedule
- Click Cancel to close Send/receive dialog.
Video 0.4.2b Avoiding Conflicts in a Shared Project
Avoiding conflicts
- Only one member at a time should have editing permission.
- Other users should add notes.
- Do Send/receive more often when making extensive changes.
-
Video 0.5 Enhanced Resources / Introduction
Enhanced Resources are now available in addition to ordinary resources. An enhanced resource is a translation in a major language which has been 'enhanced' by having keywords in the text linked to the Greek or Hebrew terms they translate.
Download/Install
- Enriched resources can be downloaded in the same way as resources.
See the video 0.3b "How to download Resources and Enhanced Resources".
Open an Enhanced Resource
- Click the Open icon on the toolbar.
- If necessary, click the Enhanced Resources button to include enhanced resources in the list. (Note the plus sign after the short name).
- Select an enhanced resource and click OK.
The Enhanced Resource opens, as well as a guide. This warning explains that the enhanced resource is a work in progress. - Close the warning.
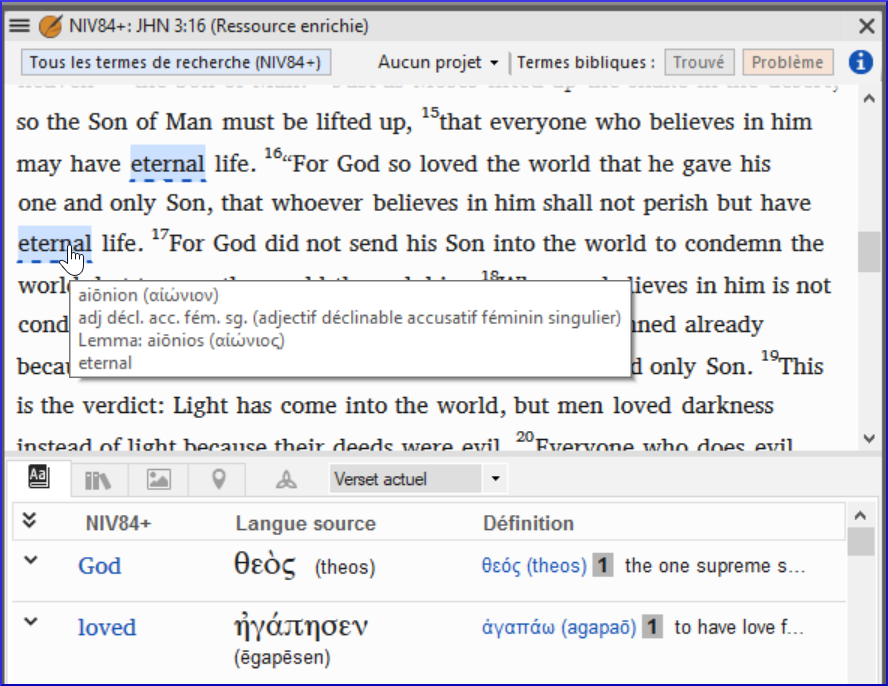
Viewing research termsYou can choose which terms to view, and also expand entries, and view all research terms, only terms in a linked project,
View all research terms: Click the All Research Terms button. Or click again, to only see highlighting when you hover over each term.
- Click the number of occurrences to open a list of all the places this sense occurs.
- To turn off the Word filter, click the X.
The tab icon is black if information is available in that tab for the current filter.
Found/Problem
Make sure the enhanced resource is linked to the relevant project,
- Click Found to turn on and off highlighting of approved renderings of Biblical terms in both windows.
- Click Problem to turn on and off highlighting of missing or guessed renderings of Biblical terms.
Expanding entries
When viewing multiple terms, the entries are not expanded by default. This number shows which sense is relevant in this verse.
- Click the down arrow to expand the entry. OR
- Alternatively, the double chevron expands all the entries.
Entry with multiple senses
The sense which is relevant for this verse is shown in black, and the others are in grey. At the end of each sense, the number of occurrences of that sense is shown.
- Click the link with a number
A search result list shows all the verses which contain this sense.
The research pane has four tabs
When a tab is gray it indicates that there is no information available about that selection of text.
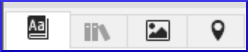
Dictionary tabis where you can see the definition and other information about the terms.Encyclopedia tab(in English)Media tabShows pictures and other media related to the verse or section. (In English only)Maps tabMaps are very helpful to understand the context of some passagesBiblical terms tool IconBiblical terms tool icon opens the Biblical term s tool for the linked project.