<-- Stage 1 – Drafting | Stage 3: Preparing for the Consultant check -->
Stage 2: Team Checking
The second stage of a translation project involves checking by the team. In this second stage you will use many tools to ensure that you have been consistent in your translation. You will read through your text, work on proper names, Biblical key terms, spell checking, and formatting checks. You will also print out a draft and use a variety of notes: project notes, spelling notes, Biblical terms discussion notes to record your questions, discussions and decisions.
The following modules will help you in this stage:
- 7: PN – Proper Names
- 8: SP – Spell Checking
- 10: BT – A 4-Step process for consistent Biblical Terms
- 13: FC – Formatting checks
- 12: BC2 – Basic Checks
- 14: PD – Printing Drafts
- 15: UN – Using Notes
7: PN – Proper Names
Introduction
In this module, you will check that the proper names have been transliterated consistently. There are two ways to do this. One way is to have Paratext guess the proper names based on statistical analysis of a model text. The other way is to tell Paratext the changes for specific characters.
Where we are
You have (or are working on) the rules for transliterating the names.
Why this is important
You want to be consistent so that is clear who is being referred to in the text.
What you are going to do
You will:
- filter the Major Biblical terms list on Names.
- EITHER use the Guess renderings tool to guess the appropriate rendering of the names.
- OR use the Adapt Names tool to enter your transliteration rules for each letter.
- edit and approve the individual names.
- add the approved names as proposed names in the Biblical terms list.
- work through the Biblical Terms list to ensure that all the verses are consistent.
-
7.1: Run the Biblical Terms tool
- Click in your project
- ≡ Tab, under Tools > Biblical Terms ...
7.1.1: Open list of terms
- ≡ Tab, under Biblical terms > Select Biblical terms list
- Double-click the "Major Biblical Terms" list
7.1.2: Choose your reference text as a comparative text
- Click the Comparative Texts button on the toolbar.
- Choose your reference text, then click → (right arrow).
- Click OK.
7.1.3: Change various settings
- Click the second filter button
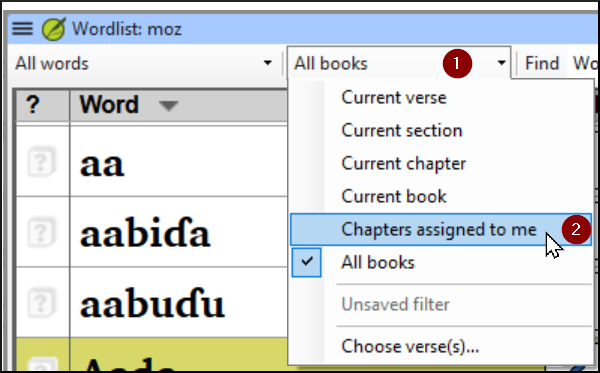
- Choose Chapters Assigned to Me
Note: The terms column is in Greek (or Hebrew) by default. You can see the terms in a roman script by using the ≡ Tab, under View menu > Transliterate terms.
7.1.4: Filter for names
- Click the first filter button
- Choose « New Filter »
- In the dialog box, under Categories…
- Select « Names »
- Click OK
-
7.2: Guess Renderings for proper nouns
- ≡ Tab, under Tools > Guess renderings
- Click OK
Paratext will add renderings to any terms which do not have a rendering (with an orange background)
You will need to approve these renderings (see 7.4)
-
7.3: Adapt names
Adapting names should be done in the early stages of a translation project, before you have approved renderings of proper names. Otherwise you can use the guess renderings (see above).
- ≡ Tab, under Tools > Adapt Names
- Choose the language of your reference text (e.g. English or français)
The Name Adaptation dialogue is displayed
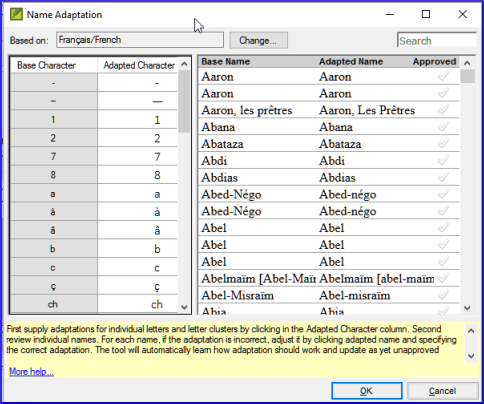
7.3.1: Enter the changes for the individual letters (or letter clusters)
- In the left pane, fill in the “Adapted Character” column for the individual letters or letter clusters.
7.3.2: Then revise and approve the Adapted Name
- Work through the Adapted name column in the right pane.
- For each name, if the adapted name is incorrect, click on the name in the Adapted Name column,
- Edit the name and click OK
- Once the name is correct, click in the "Approved" column.
- Click OK.
Paratext 9 will propose a name (in red) in the rendering column of the biblical terms tool.
-
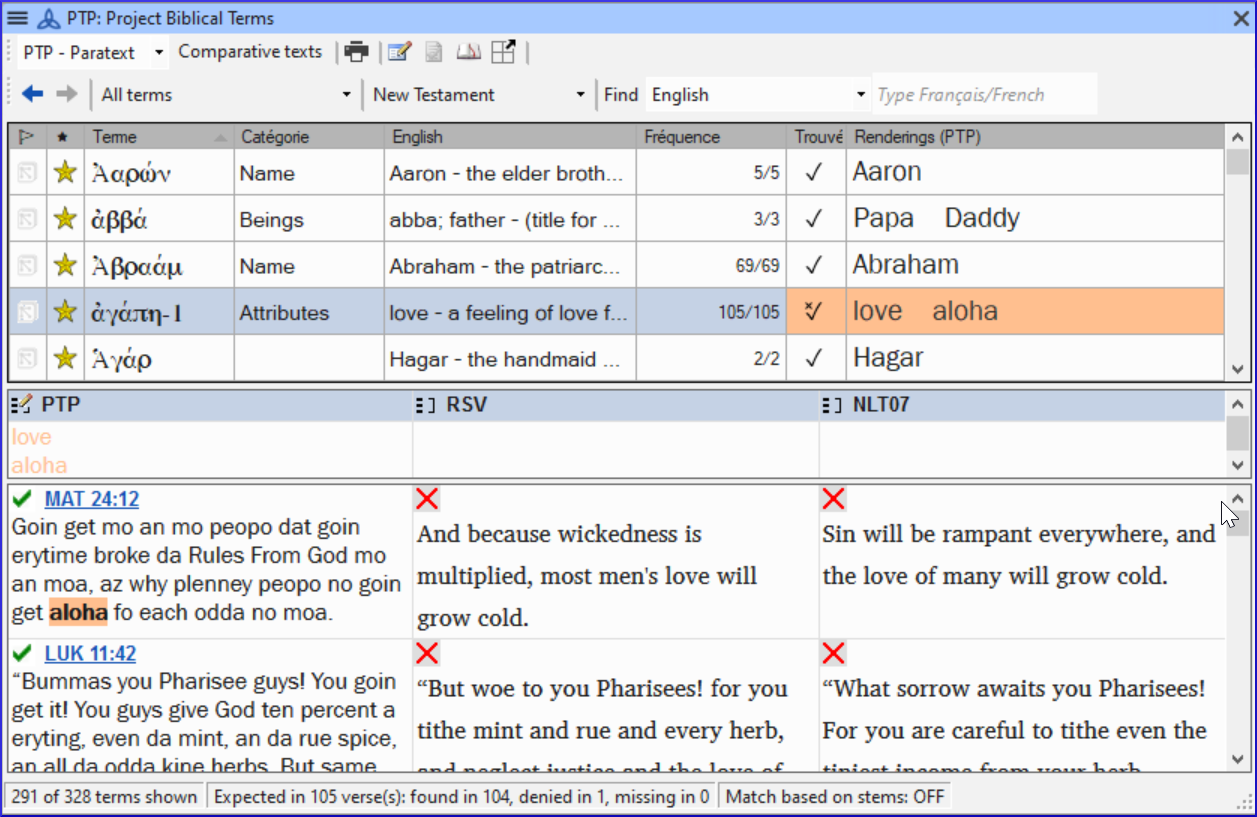
7.4: Ensure your text is consistent
You need to work through the list and confirm that all the verses use the name consistently.
- Click the name in the top pane.
- Click on a verse in the lower pane which doesn’t have the proposed form of the name.
- Click on the Edit link
- Correct as necessary, then click Close
- Repeat for each name.
-
7.5: Add an alternative rendering
- Click the name in the top pane.
- Select the word(s) in your text
- Click on Add rendering button or Ctrl+A
-
7.6: Dealing with verses that do not have the name translated
There are times when a verse is correctly translated even though you have not used the name. For example, a pronoun is used instead of the name. In this case you need to tell Paratext 9 that it is correct (that is, deny that the rendering is missing).
- Click the red cross at the left of the verse reference

The cross turn into green tick (check) with a red cross .
.
- If you clicked on the red cross by mistake, click again on the icon
Note: Paratext 9 does not find names in the introductions, headings, footnotes, captions or glossary. (You could use the Word List to find possible mistakes.)
-
7.7: Recall
- To transliterate proper names, you the ___ list on names.
- Then use the _ menu and __ command.
- After entering the _ changes then the adapted names.
- Paratext 9 then enters a __ rendering for all the names.
- You then work through the list _ and/or adding renderings and making sure that all verses are _.
- You can add a rendering by selecting the text and pressing Ctrl+__.
- If a pronoun is used you can __ the rending by clicking on the
.
Answers: filter, Major Biblical Terms, names, Tools, Adapt Names, character, approve, proposed, correcting, consistent, A, deny
8: SP – Spell Checking
Introduction
This module explains how to check for spelling mistakes in the text you have typed into your project in Paratext 9.
Where we are
You have typed your text in Paratext 9 and have done some checks but there may still be spelling mistakes in the text.
Why is this important?
It is important to correct any spelling mistakes so that your text will communicate clearly.
What you are going to do
- Configure the wordlist to build up a base of correct words.
- Work through your text with red squiggly lines showing words that Paratext does not know are correct.
- Work through your wordlist, either correcting mistakes or telling Paratext 9 that the words are correct.
- Use a variety of checks from the word list.
- Add a spelling discussion note to words that require further discussion before a correct spelling is decided.
-
8.1: Configure the word list
Before you can check the spelling, it is important to have a base of words that are known to be correct. There are three things we can do:
8.1.1: Approve the spelling of common words
In Paratext
- ≡ Tab, under Tools > Wordlist
In the Wordlist
- ≡ Tab, under Tools > Approve spelling of common words
- Enter a number
The number is the number of times the words must appear to automatically mark it as being spelled correctly. The default is 100 but you can choose more (if you have doubts about the text) or less (if you are confident about the accuracy of the typist).
- Click OK
- Click Yes (to confirm that you cannot undo)
8.1.2: Check the words that Paratext thinks are incorrect
In the Wordlist (≡ Tab under Tools > Word List)
- ≡ Tab, under Tools > Spell Check > All checks
A list of word s is displayed. - Click on a word in the top pane.
- If the word is correct – click the green checkbox
 at the top of the column
- If the word is incorrect, but Paratext 9 has suggested the correct word, then click the blue link for the correct word.
- If the word is incorrect, and Paratext 9 hasn’t suggested the correct word, click on the red checkbox
 and correct the word. (See 9.3)
8.1.3: Check similarly spelled words
In the Wordlist
- ≡ Tab, under Tools > Find Similar Words
- Enter letters which sound alike separated by `/` (e.g. `s`/`sh`/`z`)
Depending on your language, tick or untick “Ignore all diacritics when comparing words”.
- Click OK
A list of words is displayed. - Correct the words (as described above).
-
8.2: Spell checking – from the text
In Paratext
- ≡ Tab, under View > Display spelling
A progress meter is displayed initially, then all the words that are either unknown or incorrect have red squiggly lines underneath.
8.2.1: Making corrections
Paratext 9 will underline in red the words that have not been approved in the word list. This either means that the word is misspelled or unknown.
- Right-click a word which is underlined in either red or grey
A dialogue is displayed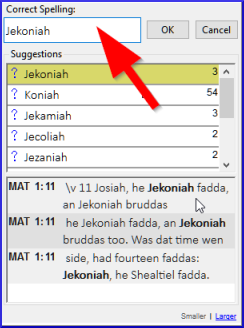
- Either type the correction in the box or select the correct word from the list
- Click OK
When possible, it is better to use the spelling check even when making minor corrections as Paratext 9 will remember the correction and you can apply the correction if it happens again.
When there is more than one correction, a dialog box is displayed. Choose as appropriate:
Yes = changes this verse and looks for the next
No = skips this verse and looks for the next
Yes to all – is too dangerous, DON’T use it
Cancel = stops further changes
-
8.3: Spell checking – current book
- ≡ Tab, under Tools > Spell Check Current Book
A window appears with a list of some words in the current book.

- Make corrections as explained above (9.3)
- Click « More items available » to see additional words.
- Continue as needed.
-
8.4: Spell checking – from the wordlist
8.4.1: Using the checks
In the Wordlist
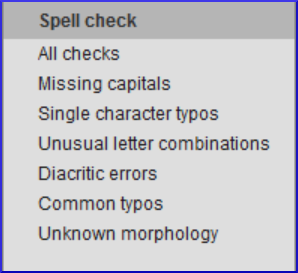
- ≡ Tab, under Tools> Spell check >
- Choose the desired check (see descriptions below)
A list of words is displayed.
- Make the corrections as needed.
- Click "More items available" to see more words.
- Continue as needed.
- When the list is finished, a message is displayed
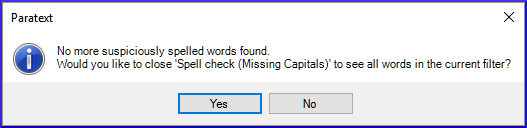
- Click Yes.
8.4.2: All checks
This runs all of the checks. This is very useful as it will find all types of errors especially words with multiple types of errors.
8.4.3: Missing Capitals
- A list of words is displayed which have capitalised forms but are not always capitalised (that is both forms are used). The list shows the word with a lower case, then the capitalised form below it, which has a blue link to the word

- Click the blue link to the capitalised form

- Click the appropriate blue link.
- Show incorrect (to see the verses)
- The two forms are acceptable (to accept both forms)
- Capitalise All (to correct all the words)
8.4.4: Single Character Typos
A list of words is displayed with links to other words which are similar but only have one letter different.
8.4.5: Unusual Letter Combinations
A list of words is displayed which have unusual combination of letters (such as consonant or vowel clusters …).
8.4.6: Diacritic Errors
A list of words is displayed with links to other words which are the same except for the diacritics.
8.4.7: Common Typos
A list of words is displayed which have the same type of problem which have already been corrected in other words. E.g. if you have already corrected "`teh`" as "`the`", and it finds "`tehm`" it will suggest "`them`".
8.4.8: Unknown Morphology
A list of words is displayed which the computer has not been able to guess the morphology based on other words.
8.4.9: Find incorrectly joined or split words
In the Wordlist (≡ Tab, under Tools – Wordlist)
- ≡ Tab, under Tools> Find Incorrectly Joined or Split Words
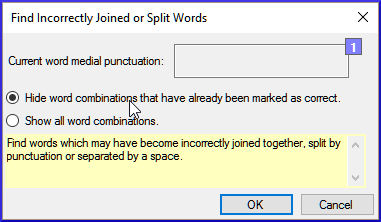
- Type in any punctuation which can be in the middle of a word e.g. - '
- Click OK
A list of words is displayed with similar words grouped together.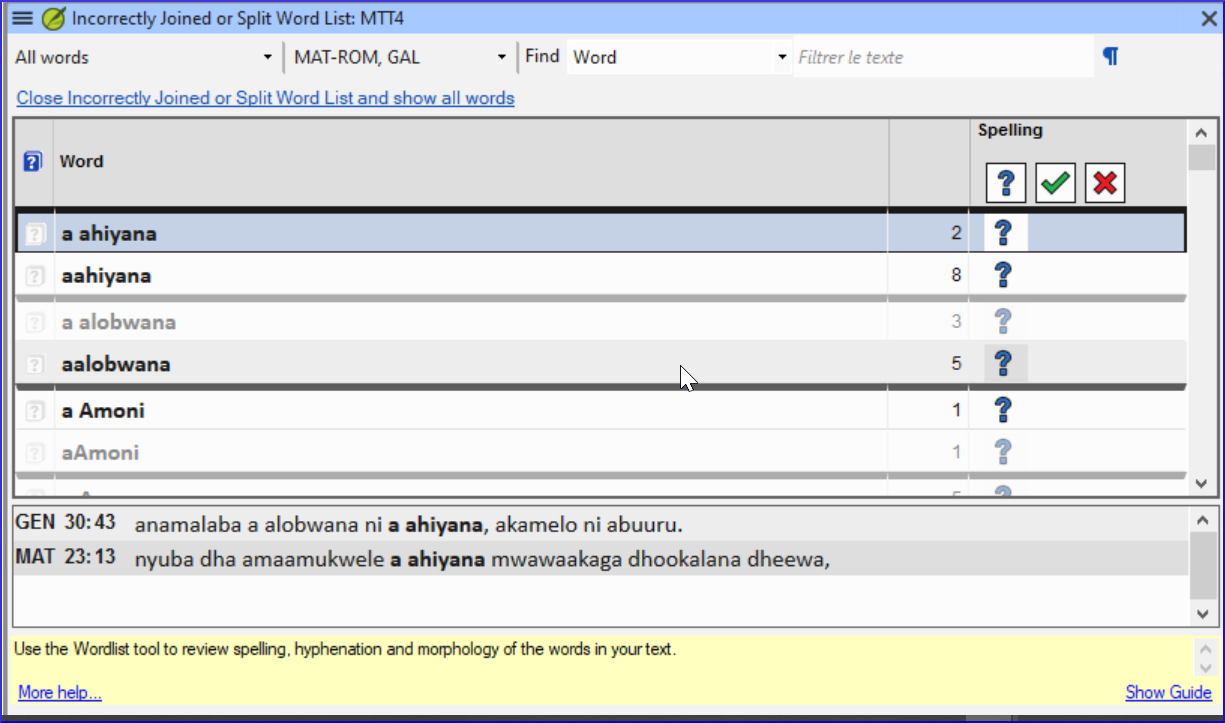
8.4.10: Correct a word which was incorrectly marked
- Find the word in the list (using the filter if necessary)
- Click on the line to see the word in context
- Click the correct spelling status.
-
8.5: Spelling discussion note
- Double-click on the note icon (in the first column)

- Type in the note
- Assign the note as necessary.
- Click OK.
9: GL – Glossary
Introduction
This module explains how to add entries to the glossary using the Biblical terms tool.
Where we are
You have drafted and entered your text in Paratext 9. Now you will add some glossary entries to explain some of the terms.
Why this is important
It is good to have a list of important words and their explanations so that the readers can understand the text well. Rather than typing directly into the glossary, it is better to use the Biblical terms tool as it keeps the Glossary in alphabetical order. The tool also keeps track of the changes to the glossary.
What you are going to do
You will use the Biblical terms tool to add a rendering for the term and then use the glossary tab to enter the citation form and the definition.
There are four training videos available on adding, linking and editing glossaries. P9 1A.4a-d.
-
9.1: Open the Biblical Terms tool
- Move to a verse which contains the term you want to add to the glossary.
- Right-click and choose "View Biblical Terms", then "Current Verset(s)"
- Check that you have the correct list open (e.g. your project list or the NT Key Biblical Terms [SIL])
-
- To change the list, from the ≡ Tab, under Biblical terms menu choose Select biblical terms list
-
9.2: Add an entry
- Double-click on the term in the list in the top pane
- Click the "Glossary" tab
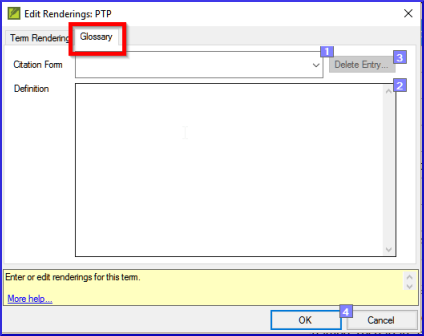
- Type the citation form of the term (i.e. the way you want it in the glossary) [1]
- Type the Definition [2]
- Click OK
The word(s) and the definition will be added to the glossary in alphabetical order.
-
9.3: Link an existing entry
If the word is already in the glossary, you can link a biblical term to the existing entry in the glossary. Later in stage 6 you will link the biblical term to the text to add the * in the printed text or the link in the electronic app.
- From the Biblical Terms tool
- Check that you have the correct list open (e.g. your project list or the NT Key Biblical Terms [SIL])
- Double-click on the word in the list in the top pane
- Click the "Glossary" tab
- Click the down arrow near the citation form [1]
- Choose the entry from the glossary
- Click OK
-
9.4: View the glossary
In Paratext
- Use the navigation bar to change the book
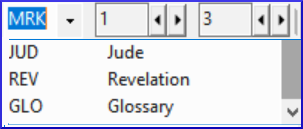
- Choose the GLO book
-
9.5: Edit an entry – in the GLO book
In Paratext
- Open the GLO book
- Edit the text as normal.
-
9.6: Edit an entry – in the Biblical Terms
- ≡ Tab, under Tools > Biblical terms...
- Double-click on the word in the list in the top pane.
- Click the "Glossary" tab
- Edit the definition
- Click OK.
-
9.7: Add a Biblical Term
- see the section 10.7: Add a term – from reference text search 10.7: Add a term – from reference text search
-
9.8: Recall
- You open the Biblical Terms tool from the menu.
- The « glossary » tab is on the dialogue. To open this dialogue you -click on the term in the _ pane.
- To view the glossary, you change to the _ book (after Revelation).
Answers: right click, Edit Rendering, double, top, GLO
10: BT – A 4-Step process for consistent Biblical Terms
Introduction
The Biblical terms rendering window and the separate Biblical terms tool are very useful to make sure you are consistent in the use of terms, especially key terms. With many terms over many books this can become quite a task. This module explains a simple 4-step process to make your Biblical Terms consistent. This is a process should be considered part of the translation process and not a check.
Where we are
You are translating a verse in Paratext 9 and you want to see what renderings have already been chosen for the terms in the current verse and then make sure they are consistent with other verses.
Why this is important
For your readers to understand your text, you need to be consistent in your use of terms. It is a big task to make them completely consistent. If you start from the verse you are translating and work from there the task is more manageable. The goal is to have consistently rendered Biblical Terms and well documented decisions on why changes were made.
What you are going to do
This method boils down to a short list of steps:
- [A] Find all the ways you have rendered this term, and enter them in the renderings dialog.
- [B] Choose which rendering is/are best, and record why it is best.
- [C] Document why you rejected the other renderings.
- [D] Clean up your translation by making this rendering consistent throughout your translation. (Make Consistent, Standardise, Normalise, Harmonise).
- Repeat with next Biblical Term you find in the Biblical Terms Renderings window.
-
10.1: Open the Biblical terms rending window
- Click in your project
- ≡ Tab, under Tools > Biblical terms rendering
- ≡ Tab (of the new window), under Biblical Terms > Select Biblical terms list
- Choose the desired list
- Click OK.
-
10.2: A: Find all the ways you have rendered this term
10.2.1: Find the terms for the current verse
- Is there a tick in the found column?
- If there is a tick, your verse uses the term and you can continue with the next term.
- If not, you need to either correct your text or add the new term you have used (see below).
10.2.2: Add another rendering
If the term you have used needs to be added to the list:
- Select the rendering of the term in your text.
- Copy it (Ctrl+C)
- Double-click in the renderings cell.
The edit renderings dialog is displayed.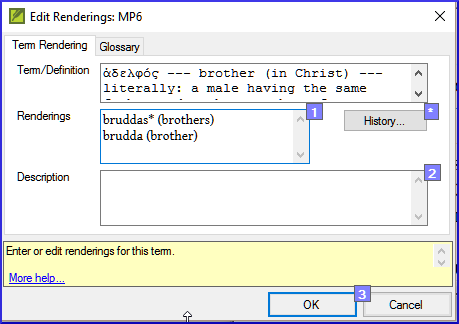
- Paste (Ctrl+V) the rendering in the dialog box.
- Click OK.
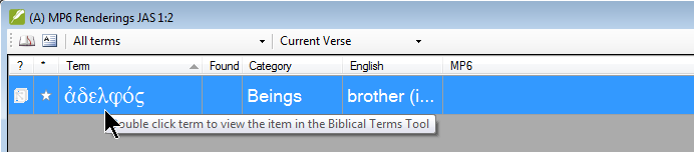
10.2.3: Find other verses in the current book with the same Biblical term
- Double-click on a word in the Term column
The Biblical Terms Tool opens - From the second filter button choose current book
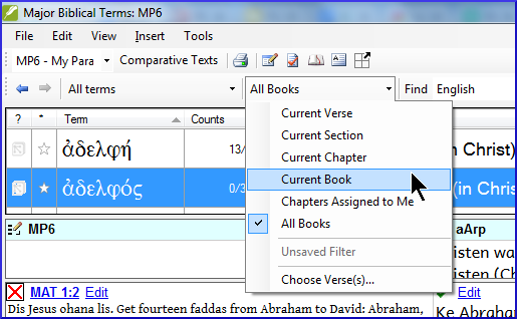
- Add renderings for the term from the verses until the terms in all verses are been identified (see below).
10.2.4: Add renderings from the other verses
- Select the rendering in the verse
- Add the rendering using Ctrl+A
- Continue until all terms for those verses have been identified.
10.2.5: Dealing with verses that do not use the term
There are times when a verse is translated without using the actual term. For example, when a pronoun is used. In this case you need to deny that it is an error.
- Click the red cross
to the left of the verse reference link. The red cross turns into a green tick with a small red x
If you click on the cross by mistake, click
and it will return to
.
-
10.3: B: Identify the best term
- Double-click on the term in the top pane.
The edit rendering dialog is displayed listing all the renderings that have been added. - Decide on the best rendering
- Section, then Cut (Ctrl+x) and paste (Ctrl+v) it to the top of the dialogue box
- Add * as necessary to combine similar renderings
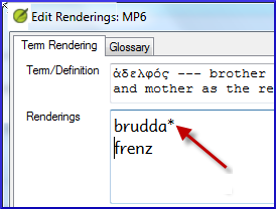
You can use * in a number of different ways: before the word for prefixes and after the word for suffixes. You can also put an * in the middle of a word. See the guide for more ways of using the *.
-
10.4: C: Reject all the others
- Select and cut the other renderings.
-
10.5: D: Document the reason for the change
- Click on the History button

- Type in the reason why the others were rejected and why the first was the best.

- Click OK
10.5.1: If you need more than one rendering
You can add more than one rendering if appropriate. It is good to add a back translation in brackets after the rendering. For example,
slave (slave)
guy * work fo (guy that works for)
- Open the Edit renderings dialog box
- Edit the renderings as needed.
10.5.2: Clean up other books (as time permits)
- Change the filter so that all the published books are displayed.
- Clean up verses as necessary.
10.5.3: Add the Biblical terms notes — ongoing discussion
- Double-click on the note icon (in the second column)

- Type in the note
- Assign the note as necessary.
- Click OK.
10.5.4: Add the decision to the renderings description
- Double-click on the term
- Type the agreed-on rendering in the description field
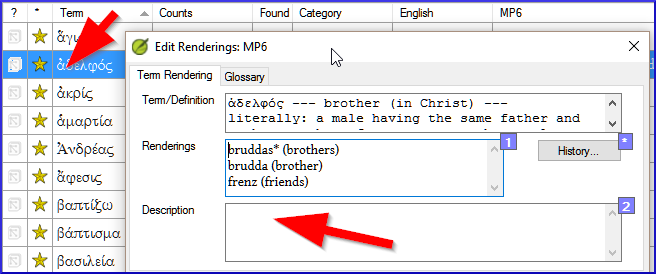
- Click OK
-
10.6: Add a term – from the source language text
You can create a list of verses for a specific Greek/Hebrew word and then use that list to add the word/phrase to your project Biblical terms list.
- Click in the window with the Source text.
- Right click on a lemma (blue word) in the source language text window
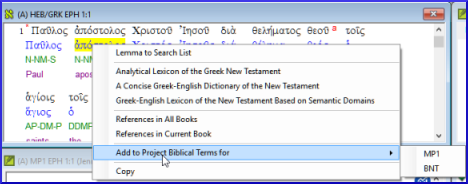
- Choose Add to project biblical terms for
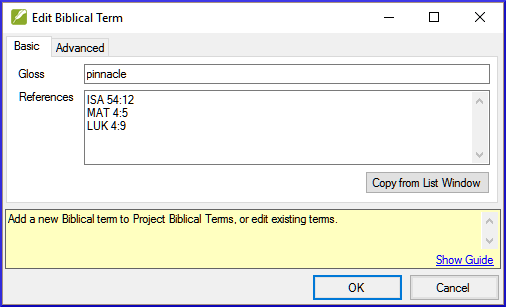
- Choose your project
- Edit the gloss if necessary
- Click on the Advanced tab
- Edit the terms if necessary
- Click OK
‒
- Change to the Biblical Terms Tool
- Double-click on the term.
-
10.7: Add a term – from reference text search
There will be terms which are important for your language and culture that are not in the list. You can add these terms to your project list.
In Paratext
- From your reference text, do a find (using ≡ Tab, under Edit > Find) and search for the term.
A list is displayed showing the verses with that term.
From the list of results
- ≡ Tab, under Edit> Add to Project Biblical Terms, then choose your project
- Edit the gloss if necessary
- Click on the Advanced tab
- Type in a name for the term
- Click OK
11: MP – Compare a word or phrase
Introduction
In this module, you will search for a word or phrase in a project and compare it with the translation of that word or phrase in another project.
Why this is important?
In Paratext 9 (and above), you can see where a word or phrase is found in one project and compare it with the equivalent word or phrase in one or more other projects. For example, you can see where "roi" is found in a French project and compare it with "rey" in a Spanish project.
You will
- use the checklist “Word or Phrase” from both the text and also from the Biblical Terms Tool.
- change the settings and comparative texts
- type the word or phrase to compare for each project
-
11.1: Compare a word of phrase – from the text
- Click in the project that you want to compare
- From the ≡ Tab, under Tools, point to Checklists, and select Word or Phrase.
The Parameters dialogue is displayed.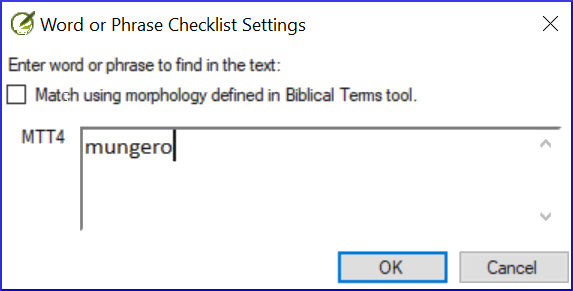
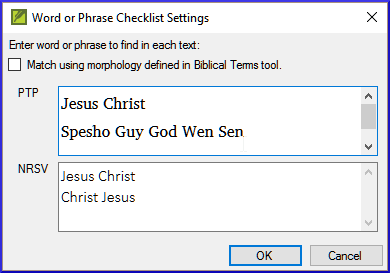
- Enter the word or phrase that you want to see into the textbox for each project of the dialogue
- Click OK
A window is displayed.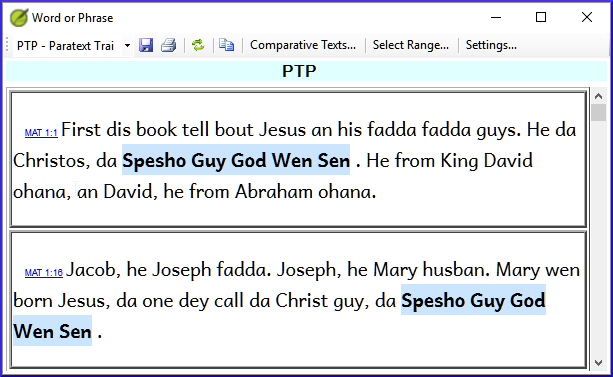
- Click Comparative Texts...
- Choose the texts that you want to compare and click OK.
The « Settings » dialogue is displayed.
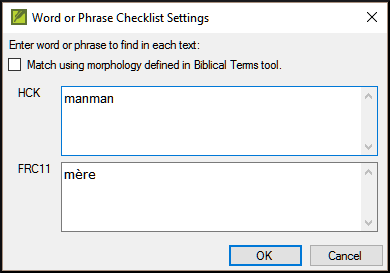
- Type the word of phrase that you want to compare in the textbox for each of the projects, then click OK.
A window is displayed with a button "Hide matches" on the toolbar.
- Click on the "Hide matches" button to show only those references where there are differences.
The list shows the verses which contain matches in only one of the projects. The word or phrase is highlighted in light blue.
-
11.2: Compare using a Word of Phrase from the Biblical Terms tool
- In the Biblical Terms tool
- Choose a term which has a rendering
- Click on the tool icon

The Setting dialogue is displayed with the rending filled-in. -
- Type the word or expression for the other projects
- Click OK
12: BC2 – Basic Checks
Introduction
In this module, you will learn to do several other basic checks (Characters, punctuation, capitals, and repeated words. As in the first Basic Checks module (5: BC1 – Basic checks), it is easiest to run these checks from the project plan. However, if you want to check several books, you will need to use the Verification menu.
Where are we?
You have typed your translation in Paratext 9. Be sure that you have checked the chapter/verse numbers and markers, as described in 5: BC1 – Basic checks, before continuing and that your administrator has either completed the setup of the checks or is with you to do the setup now.
Why this is important?
Paratext 9 has eleven Basic Checks. In 5: BC1 – Basic checks, you have already seen the first two, chapter/verse numbers and markers. This module will help you to find errors linked to spelling, punctuation, capital letters and repeated words. Even though these errors may not influence the content of the text, correcting them makes the text easier to read.
What we are going to do:
Most of the checks require that an inventory has been completed by your administrator. In this module you will
- Confirm that the setup has been done (or have the administrator do the setup)
- do the Basic Checks
- correct any errors.
-
12.1: Confirm the setup
Note: Before you can run these other basic checks some form of setup must be done. Some checks require an inventory others require settings. You can do most of the inventories, but only your Administrator can do the settings.
The required setup may be an inventory, some rules or settings.
-
12.2: Using inventories to setup checks
These inventories show what is currently in your text, that is, both the good and the bad. You need to work through the inventory and tell Paratext 9 which elements are correct (valid) and which are errors (invalid).
Once you have finished the inventory you will be ready to do the check.
- From the ≡ Tab, under Tools > Checking inventories menu, choose the appropriate inventory (for example Character inventory).
- Click on an item in the list in the top pane.
The verses are shown in the bottom pane. - For each item in the top pane, choose either Valid or Invalid.
- Repeat for each item.
- Click OK.
Note: Instead of using the mouse, you can use Ctrl + y to mark an entry as Valid or Ctrl + n to mark an entry as Invalid.
-
12.3: Characters
This check (and inventory) helps you identify all the incorrect characters, i.e. the characters which are not in your alphabet.
Setup required
- ≡ Tab, under Tools > Checking inventories > Character inventory
- For each item, choose Valid or Invalid.
Check
- ≡ Tab, under Tools> Run Basic Checks
- Check "Characters"
- Click OK.
A list of errors is displayed. - Make any corrections as needed.
-
12.4: Punctuation
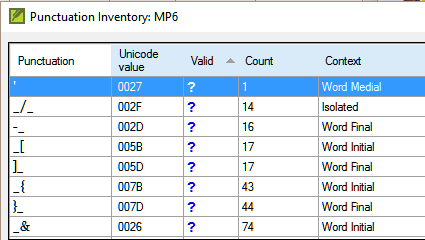
Identify all the incorrect or misplaced punctuation marks. (Use the Unicode character column to clearly identify the punctuation.)
Setup required
- ≡ Tab, under Tools > Checking inventories > Punctuation Inventory
- Check each punctuation mark in its context.
The contexts can be: word initial, word medial, word final or isolated (space before and after).
-
- Click OK.
Check
- ≡ Tab, under Tools > Run Basic Checks
- Check « Punctuation »
- Click OK.
A list of errors is displayed. - Make any corrections as needed.
-
12.5: Matched Pairs
Setup required
- ≡ Tab, under > Unmatched pairs of punctuation:
- If the list is empty, then there are no errors.
- If necessary, click Options... to add other pairs
Check
- ≡ Tab, under Tools > Run Basic Checks
- Check « Unmatched pairs of punctuation»
- Click OK.
A list of errors is displayed. - Make any corrections as needed.
-
12.6: Repeated words
Setup required
- ≡ Tab, under Tools < Checking inventories > Repeated words inventory:
- For each item, choose Valid or Invalid.
Check
- ≡ Tab, under Tools > Run Basic Checks
- Check « Repeated words
- Click OK.
A list of errors is displayed. - Make any corrections as needed.
-
12.7: Capitalization
Setup required
- ≡ Tab, under > Tools < Checking inventories > Markers Missing Final Sentence Punctuation
- For each item, choose Valid or Invalid.
- ≡ Tab, under > Tools < Checking inventories >> Markers followed by a lower case letter
- For each item, choose Valid or Invalid.
- ≡ Tab, under > Tools < Checking inventories >> Punctuation Followed by a Lower Case letter
- For each item, choose Valid or Invalid.
- ≡ Tab, under > Tools < Checking inventories >> Mixed Capitalization
- If you have lowercase prefixes, click Options and enter the details.
- For each item, choose Valid or Invalid.
Check
- ≡ Tab, under Tools > Run Basic Checks
- Check « Capitalization »
- Click OK.
A list of errors is displayed. - Make any corrections as needed.
-
12.8: Making minor corrections
It is possible to make minor corrections from within a displayed inventory. However, if there are several errors it is best to run the check to make the corrections.
- Click on a verse in the lower pane
- Hold the Shift and double-click
- Make the correction
- Click OK.
In some cases, it is preferable to use the Wordlist or the spell checker to several errors at once.
12.8.1: Review
There are many basic checks in Paratext 9. The table below summarizes the setup needed for each of the checks.
| Check | Setup | |
| Chapter/verse numbers | none | |
| Markers | Marker inventory | |
| Characters (Combinations) | Character inventory | |
| Punctuation | Punctuation inventory | |
| Capitalization | 4 inventories Markers Missing Final Sentence Punctuation Markers followed by a lower case letter Punctuation Followed by a Lower Case letter Mixed Capitalization | |
| Repeated words | Repeated words inventory | |
| Unmatched pairs of punctuation | Unmatched pairs of punctuation inventory | |
| Quotations | ≡ Tab, under Project Setting > Quotation rules | |
| Numbers | ≡ Tab, under Project Setting > Number settings | |
| References | ≡ Tab, under Project Setting > Scripture reference settings | |
| Quoted text | none | |
It is possible to run all the checks at the same time, however when running the checks for the first time it is better to run them one at a time to avoid large list of errors.
13: FC – Formatting checks
Introduction
In this module, you will find and correct formatting and layout errors.
Where we are
You have typed your draft into a project in Paratext. You will use the checklists to find and correct errors related to the formatting and layout errors.
Why this is important
A New Testament contains more than just chapters and verses. There are also titles, section headings, and several types of paragraphs. These checks allow you to be sure that the layout of your text is correct, and your titles etc. are consistent.
What are you going to do?
You will use the checklists to
- compare your titles and section headings
- check your paragraph breaks
- compare the paragraph markers in your text with those of your reference text
- add markers for special text formatting.
-
13.1: Using the checklists – generic
There are a number of checklists which differ slightly but they have the following in common:
How to display the checklist
- ≡ Tab, under > Tools > Checklists > choose the desired list
- Add a comparative text (if desired) by clicking on the Texts button. Comparative text button
- Select the verses/books (as necessary) using the Select range
Making corrections
- Click the Edit link to correct any errors
- Click on the reference link to see more context
Close the list
- When you have finished with the list, close it by clicking the X at the top right corner of the window.
-
13.2: Using checklist – Section headings
- ≡ Tab, under > Tools > Checklists > Markers
Check that
- the headings are consistent with your reference text (length, grammar, style))
- all headings start with a capital
- there is not punctuation at the end
- they are not too long
-
13.3: Paragraph breaks
- ≡ Tab, under > Tools < Checklists > Markers
- Choose your reference text as the comparative text
- Click Settings
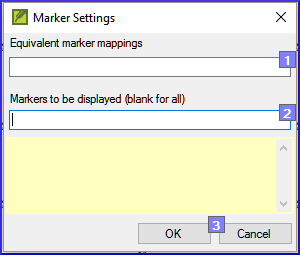
- Type the paragraph makers to be displayed
(e.g. p m) - Click OK
- Make any corrections by clicking on the blue Edit link.
OR
- Click on the blue verse reference link.
- Make any corrections in Paratext.
- Return to the checklist by clicking on the icon on the taskbar.
-
13.4: Layout and indents
- ≡ Tab, under Tools > Checklists > Markers
- Choose your reference text as a comparative text.
- Click Settings

- Type in the markers to check.
- Click OK.
- Look for passages that have been formatted with different markers such as q1 and q2
- Make any necessary changes (see below).
-
13.5: Add USFMs to format special text
- See the list of passages with special formatting Appendix A.
- Add the USFM as necessary (see module KD or help if necessary).
14: PD – Printing Drafts
Introduction
In this module you will learn how to print a draft of your translation for checking and revising.
Where we are
You have entered and checked your translation in Paratext 9 and are now ready to print out a copy. Your project must be registered before you can print.
Why this is important
It is much easier to revise and check your work on paper than on the computer. You can also give it to more people if it is on paper.
What you are going to do
You will first produce a PDF version of your translation, which you can print or share with others (including non-Paratext users). If necessary, you can copy the PDF file onto your USB stick and take it to a computer with a printer.
-
14.1: Create a PDF file
Make sure you have completed the markers check before printing a draft.
- ≡ Tab, under Project > Export Draft PDF
- Check that your project is selected.
- Choose which book(s) and chapters or priority to print
- Choose the page settings as follows:
- Page size:
`210mm, 297mm (A4)` or
`148mm, 210mm (A5)` - Columns: `1`
- Margins:
`25 mm ` (for A4) or
`12 mm ` (for A5) - Text body font: `Charis SIL` (or `Charis SIL Compact`)
- Size: `10 (or 11)`
- Line spacing:
`1.0 (for single spacing)`
- Page size:
- Click on the Advanced tab
- Choose the fonts
- Choose what you want in the Running header (the text at the top of the page).
- Check mirror layout on odd and even pages
- Make any other choices as needed.
- Click OK and wait, the file will open in your PDF reader.
If there are marker errors, a message box will appear. Click No, then correct the errors and try again.
Note: The first time you print a draft it takes a long time collecting information on the fonts. But it will be much quicker the next time.
-
14.2: Print a PDF
In Adobe Reader
- (Make sure the PDF file is open.)
- File > Print.
- For A5
- Choose Booklet
- Orientation: portrait (for newer printers or landscape for Win7)
- To print double-sided
If you want to follow a punctuation system (such as French) and have spaces automatically inserted before complex punctuation, then see a consultant to have changes made to your PrintDraftChanges.txt
-
14.3: Copy PDF file to a USB stick
Paratext saves the PDF file in the PrintDrafts folder of your project folder. For example, C:\My Paratext 9 Projects\XXX\PrintDraft
There are many ways to copy files. One method is described below.
- Hold the Windows Key and type E
Windows Explorer opens. - Go to your My Paratext 8 Projects folder.
- Double-click on your project folder
- Double-click the PrintDraft folder
- Right-click on the desired PDF file
- Choose Send to
- Choose your USB stick.
15: UN – Using Notes
Introduction
As you are translating and checking you may want to make comments on various errors or issues. You may also want to record your discussions on key terms and spelling issues. Paratext 9 allows you to record these comments either in the text, the Biblical terms list or the wordlist.
Where we are
You are typing or revising your text, wordlist or keyterms and need to make comments on an issue you have seen.
Attention: Notes and footnotes are very different. Footnotes are printed in the New Testament whereas notes are for questions and comments and are not printed in the New Testament.
What you are going to do
You will:
- add more note types (administrator only)
- create notes in the text using different icons,
- open, edit, and resolve notes
- open a notes list
- filter the list
- print a list of the notes
-
15.1: Different types of project notes
You can choose from many different icons for your project notes in Paratext 9:
Tip: Don't have too many icons!
An icon can have four different colours or shapes
| Icon | Description | Meaning |

| Icon has a border and a yellow background color. | The note has a least one unread comment. |

| Icon is red, purple, or light blue. | A project note assigned to you, or to the whole team, or unassigned. |

| Icon is gray. | A project note assigned to someone else. |

| Icon is gray with a green tick. | A project note with resolved status. |

| Icon is a white question mark on the cover of a book. | There is a spelling discussion note for this word. (Wordlist only.) |

| Icon is gray with a question mark on the cover of a book. | There is NOT a spelling discussion note for this word. (Wordlist only. ) |

| Icon is a light blue plus. | A consultant note. |

| Icon is a light blue globe. | A global consultant note. |

| Icon is a black exclamation point within a red triangle. | There is a Send/Receive merge conflict because two users have made different changes to the same verse. |

| Icon is a white arrow on a blue background. | There is a rendering discussion note for this Biblical Term. (Biblical terms window or tool only) |

| Icon is gray with an arrow on the cover of a book. | There is NOT a rendering discussion note for this Biblical Term. (Biblical terms window or tool only) |
15.1.1: Setup additional note types
(One must be an Administrator)
- ≡ Tab, under > Project > Project settings > Project properties
- Click the Notes tab
- Click on the Add Tab button
A new line is added. - Click the icon on the new tag line
- Choose the desired icon
- Type a name for the new note type
- Continue for any other new notes.
-
15.2: Using notes
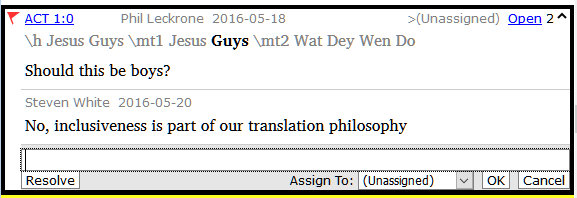
15.2.1: Inserting a project note
- Click in the text where you want the note (and select any appropriate text).
- ≡ Tab, under Insert > Note
- Choose the desired tag for the note from the list

- Type the text for the note
- Click OK.
An icon is displayed beside the text.
15.2.2: Add comments to an existing note
- Click the icon(
 ) in the text
The note opens.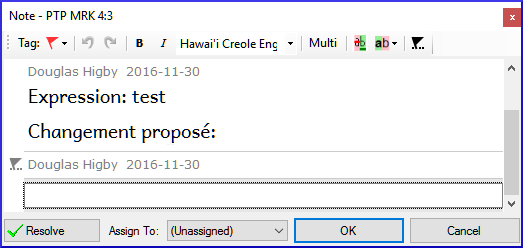
- Type a note
- Click OK
15.2.3: Assign a note to someone
- Click the icon (
) in the text.
- Type your comments
- Click Assign to
- Choose as desired
- Click OK
15.2.4: Apply notes to multiple projects
- Open the note from the text
- Click the "Multiple" button
- Choose the projects
- Click OK
- Click OK again to close the dialog box.
15.2.5: Reattach note
- Click the note icon in the text to open the note.
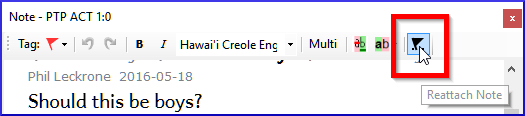
- Click the Reattach Note button (on the toolbar)

- Select the word(s) to attach it to.
- Click OK.
The note is attached to the word(s).
15.2.6: Resolve a note
- Click on the icon (
) in the text
- Type another comment if necessary.
- Click the Resolve button
- Click OK
15.2.7: Delete notes
- Click the note icon
- Click the small red x
- Click Yes to permanently delete you comment.
- If there are more comments, continue to delete the next comment.
-
15.3: Open a Notes List
When reviewing notes, it is often helpful to see them in a list.
- ≡ Tab, under Tools > Notes list
- Select your project.
- Click OK.
A note window opens.
- Adjust the filters as needed.
If the window is blank, then change the filters using the filter buttons on the toolbar (see below).
15.3.1: Notes window toolbar
There are four dropdown boxes on the toolbar
- Notes filter
- Verse filter
- Search
- Sort by [verse, date, assigned to]
15.3.2: Notes list filter
- Click the first button/list
- Choose an existing filter as appropriate
15.3.2.1: Define a new filter
- Click the first button/list
- Choose New filter
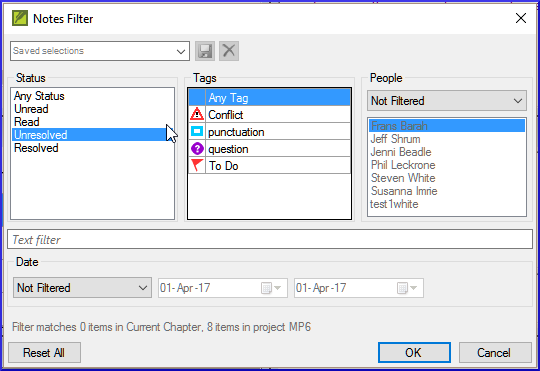
- Choose the status, tag, person and date as desired.
- Click OK
15.3.2.2: Save a filter
- Define the filter as needed.
- Click in the textbox at the top left (1).
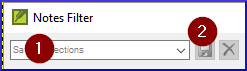
- Type a name for the filter
- Click the save icon (2).
-
15.4: Add comments from a notes window
- Click arrow to expand the note (
 )
)
The note opens, - Type your comments in the textbox.
- Resolve or assign the note as needed.
- Click the arrow to collapse the note.
-
15.5: Print a notes report
- Click in a notes window.
- Filter the list as desired.
- ≡ Tab, under Project >> Print
- Choose the printer and any options.
- Click OK.
- Close the window.
<-- Stage 1 – Drafting | Stage 3: Preparing for the Consultant check -->
